Explore AI-supported full-text screening
TABLE OF CONTENTS
1. Explore the project aim and dashboard
2. Explore the screening stage dashboard
3. Review the prepared screening instructions
4. Open My tasks and the reference list
5. Inspect AI suggestions in Logic view
6. Make decisions in Actions view
7. Review and send your decisions
8. Customize the view and continue exploring
Generate Full Text screening instructions
A separate title and abstract (TiAb) screening training project is also available: Explore AI-supported TiAb Screening. The projects are separate: you do not need to complete the TiAb exercise before starting this one.
Please note: LLM-based screening is disabled by default. If you would like to test automated screening, please contact us at support@laser.ai to enable this feature for your organization.This guide introduces AI-supported full-text (FT) screening in Laser AI. Review the prepared instructions, claim records from the shared pool, assess the PDFs and AI suggestions, and record and submit your own decisions. The FT project contains 26 references with attached PDFs and uses single screening with open-pool distribution.
1. Explore the project aim and dashboard
Open Explore AI-supported FT Screening project and select Dashboard in the left sidebar to view the description, reference count, team information, notifications and stage progress.
Select Project description to read the training aim and review context. The example concerns macrolide antibiotics in children with wheezing disease, including asthma, bronchiolitis and bronchitis. The review context includes length of hospital stay, oxygen demand, respiratory symptoms and signs, and readmission.
The purpose of this exercise is to learn the full-text screening workflow. Read the prepared decision logic carefully: it defines how the supplied training instructions assess each PDF.
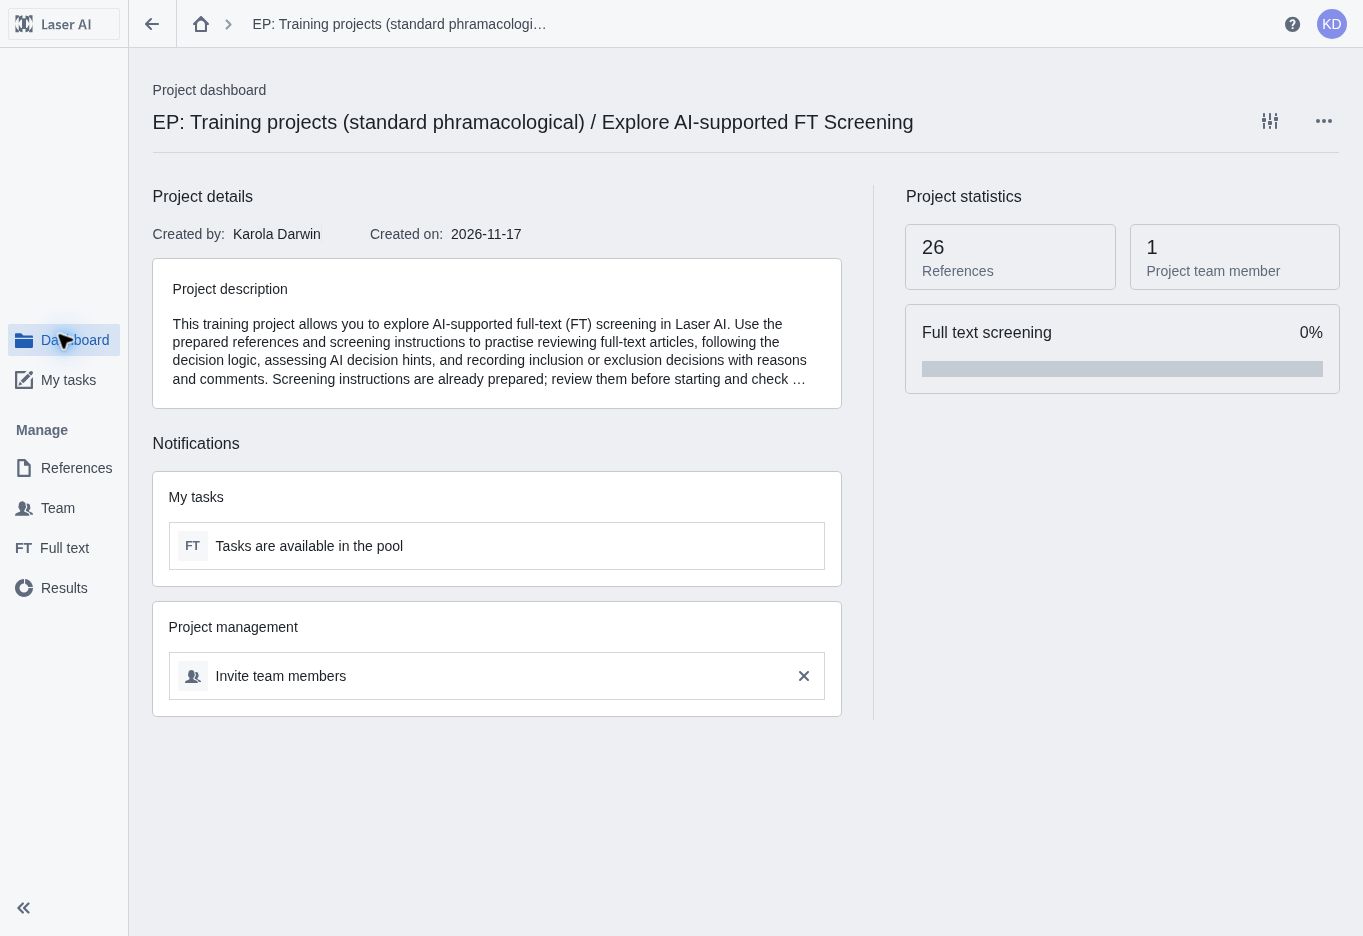
Figure 1. The Full Text Screening training project dashboard, with the project description and 26 references.
Knowledge base: Single project dashboard overview
2. Explore the screening stage dashboard
1. Select Full text under Manage in the left sidebar to open the Full-text screening stage dashboard.
2. Review Settings. Select Show beside Screening criteria and Instruction to open the prepared instructions. The project uses Single screening: one researcher assesses each claimed record.
3. Expand Screening under Steps. All 26 records have already been distributed to an Open Pool, so To distribute shows 0. You do not need to set up distribution or distribute another batch.
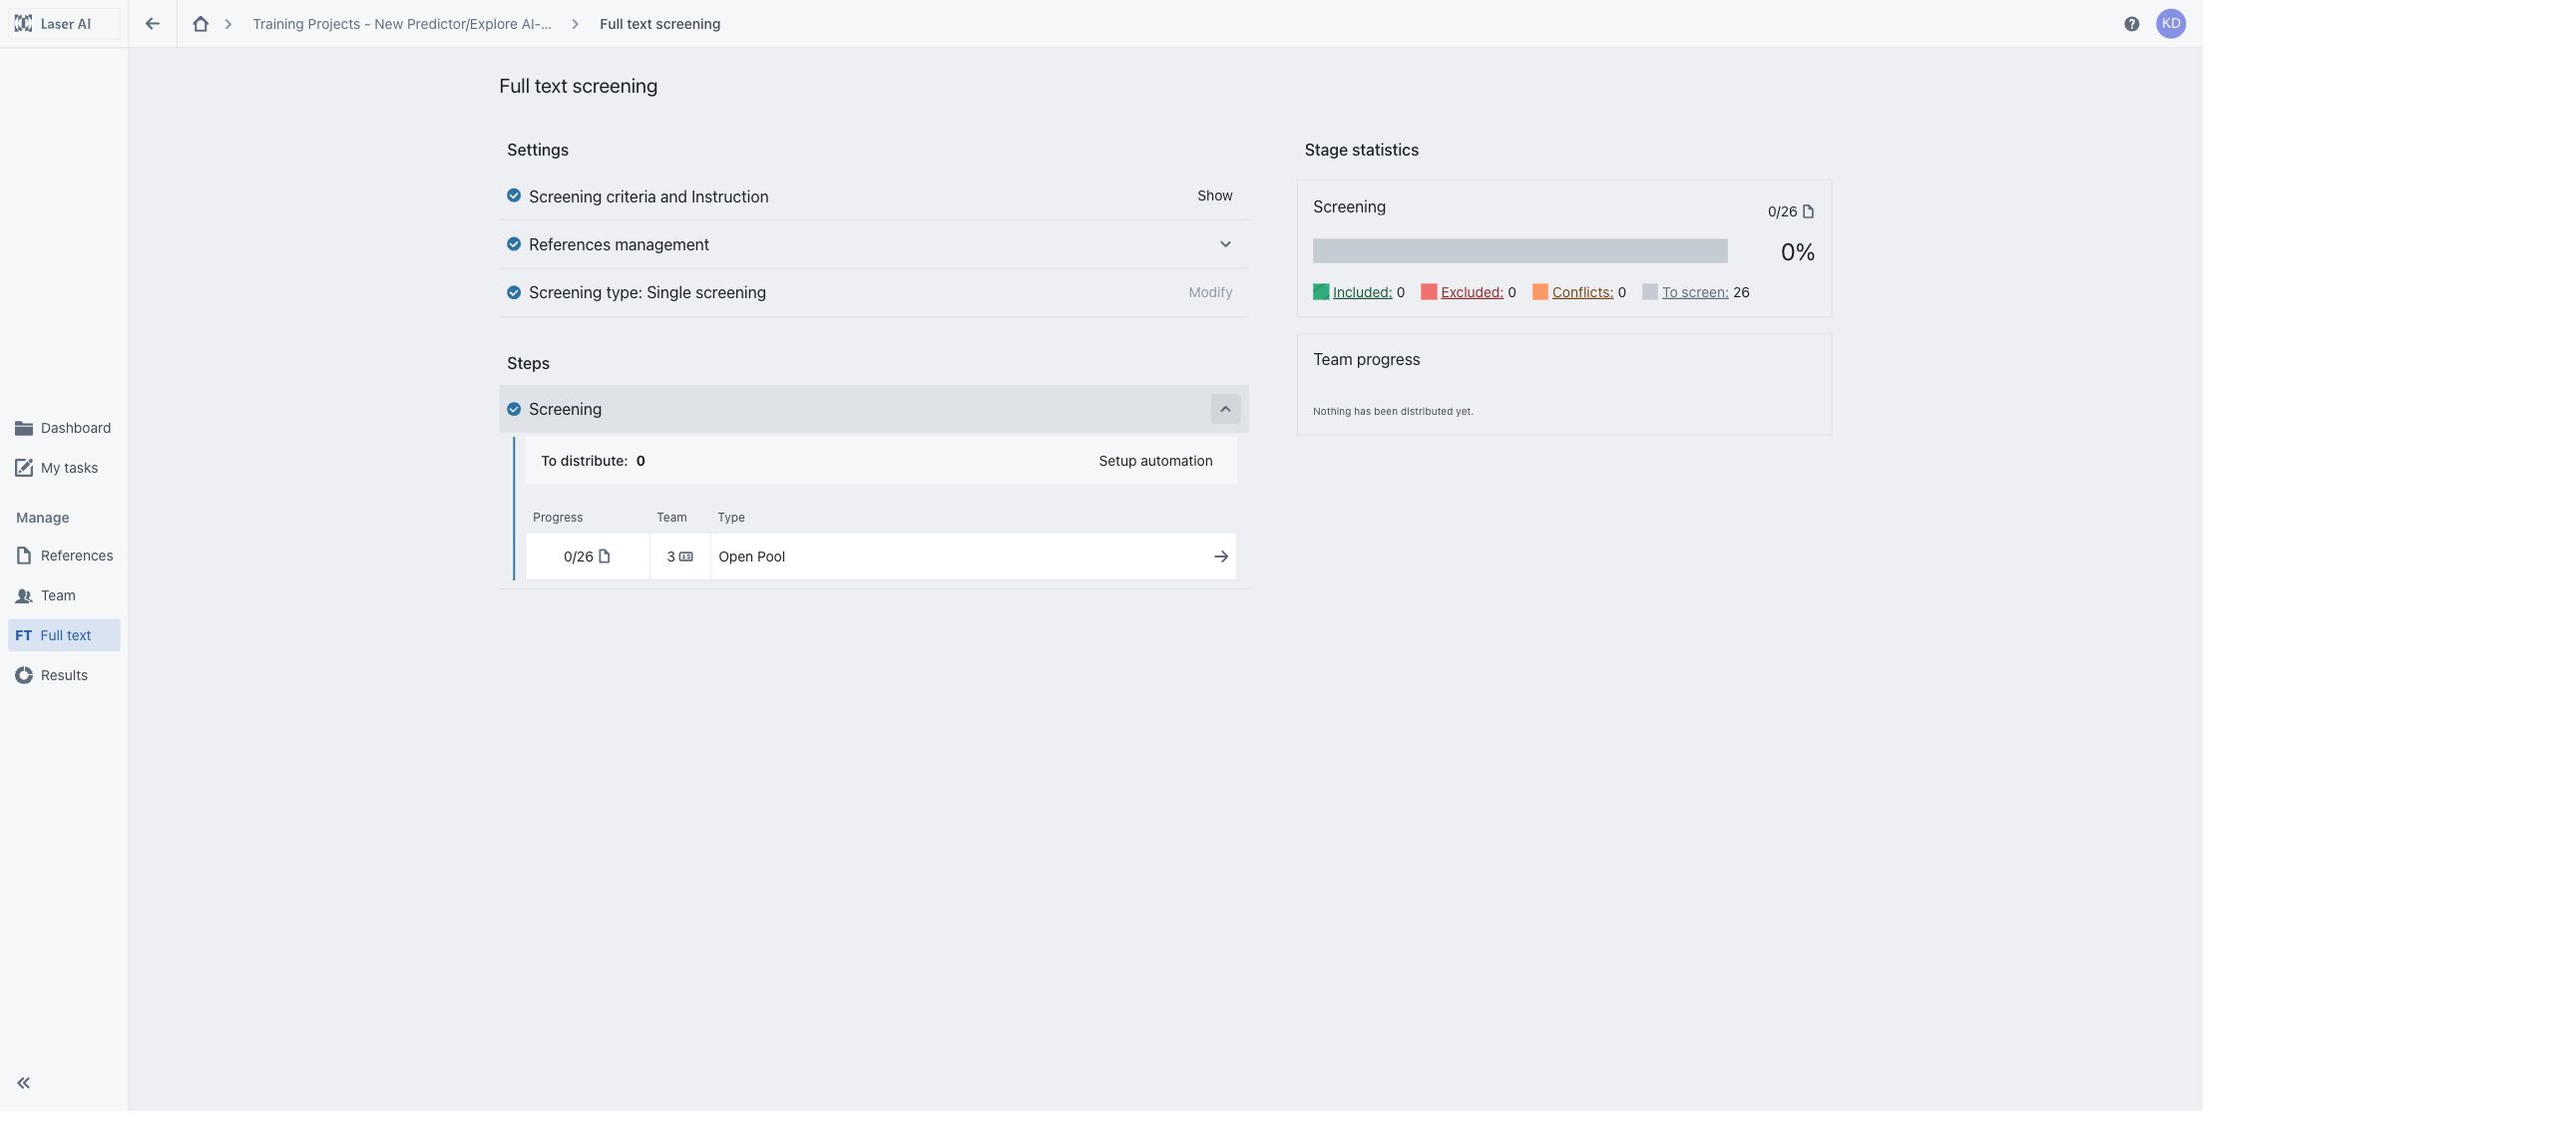
Figure 2. FT stage dashboard with Single screening and the existing Open Pool batch of 26 records. No records remain to be distributed.
4. Select Open distribution details to inspect the pool. Distribution is configured by role: Managers, Senior researchers, and Researchers can claim tasks. After new team members join the project with one of these roles, records are already available for them to claim through My tasks; no additional distribution is needed.
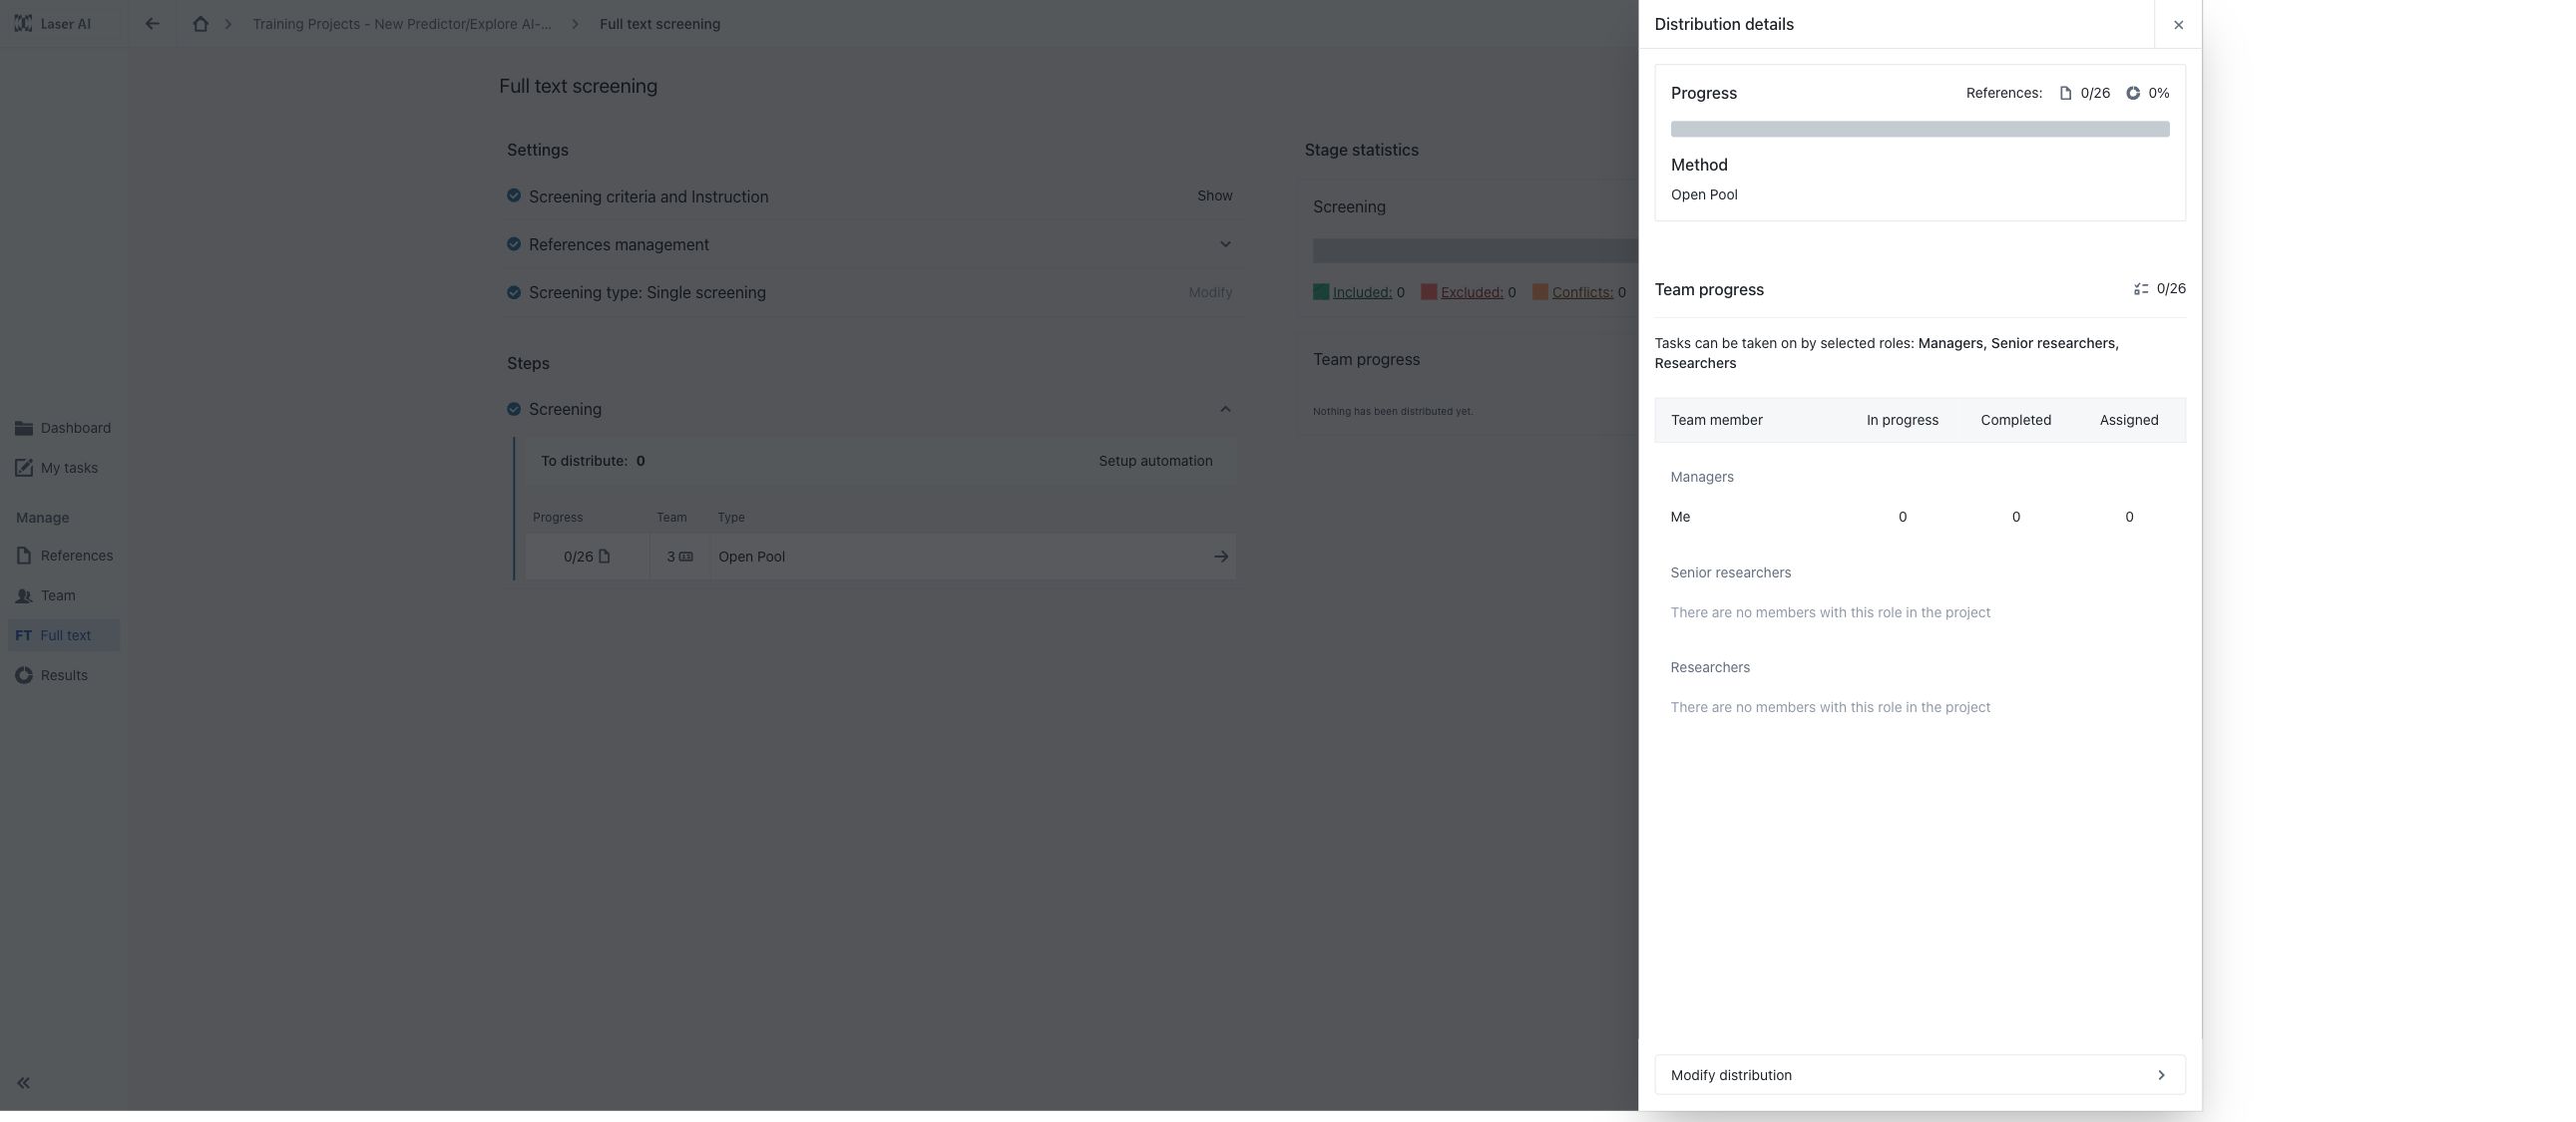
Figure 3. Open Pool distribution details showing the eligible roles: Managers, Senior researchers, and Researchers.
5. Use Stage statistics and Team progress to follow screening activity. Claiming records, recording decisions, and sending decisions are separate steps.
Learn more about distribution: Task distribution for Full text screening explains the available distribution methods. For instructions on accessing tasks and claiming records, see How to start Full text screening.
Knowledge base: Full-text stage dashboard overview
3. Review the prepared screening instructions
The screening instructions are already prepared and applied. Your task is to review and understand them; generating new instructions is an optional activity described at the end of this guide.
From the Full text dashboard, select Show next to Screening criteria and Instruction banner. Review Decision logic, the guidance within each criterion, and the available action buttons. The supplied Wheezing [FT] instruction checks:
| Criterion | Question assessed in this project |
| Study design | A parallel-group randomized controlled trial assessing effectiveness or safety. |
| Population [age] | Pediatric patients younger than 18 years. |
| Population [condition] | Childhood wheezing disease (CWD). |
| Intervention | Macrolide therapy. |
| Outcomes | At least one effectiveness outcome. |
In this FT logic, Yes continues to the next question; No / Unclear maps to that criterion’s exclusion reason. Passing all criteria leads to an inclusion suggestion. Check the full text and the detailed guidance before deciding how to handle missing information.
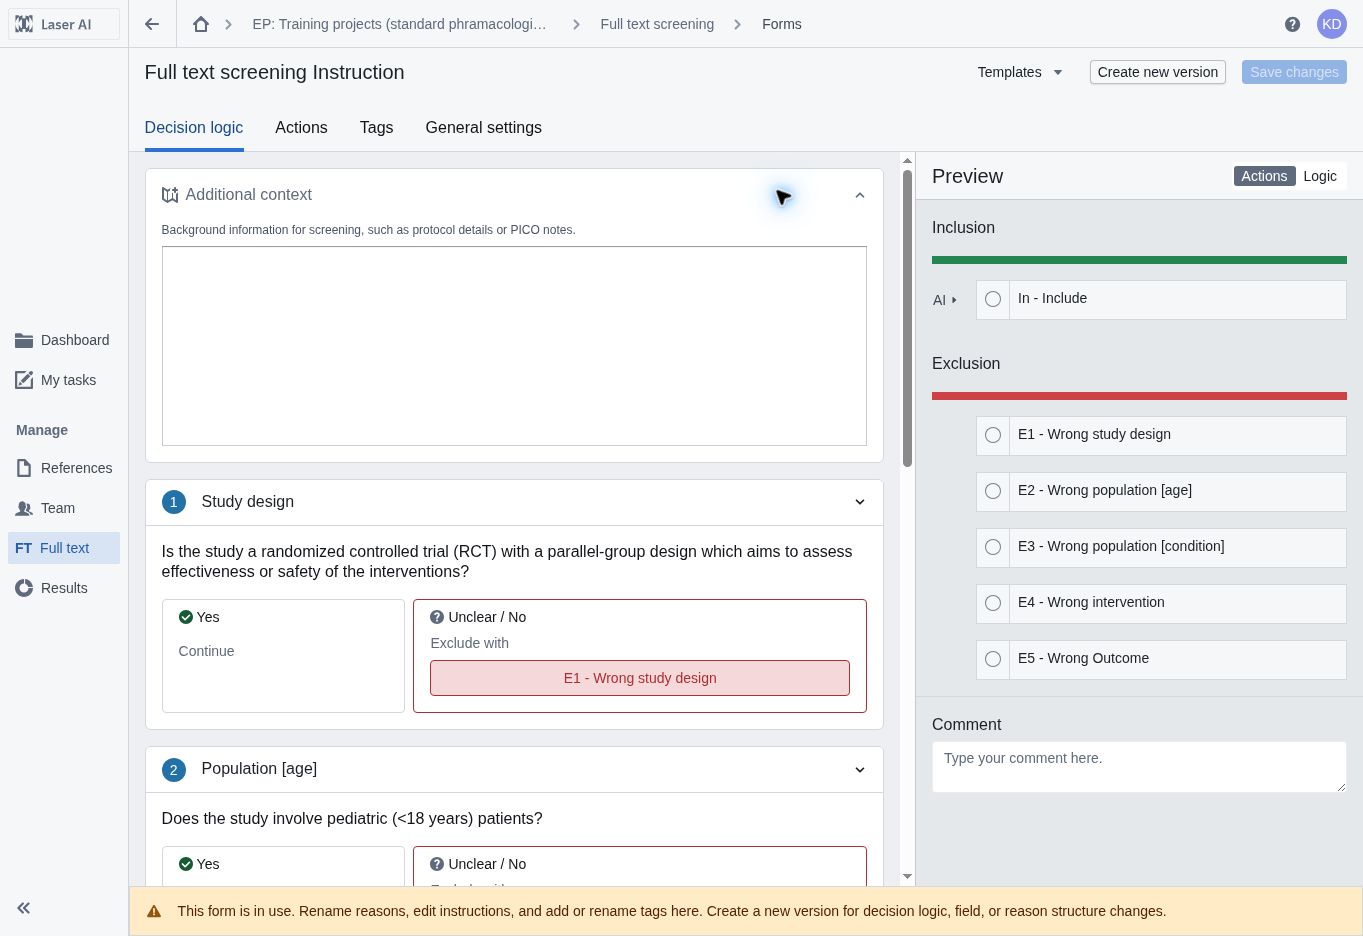
Figure 4. Prepared FT decision logic and the action preview.
Explore more: inspect Action buttons, Tags and General settings. Use the prepared instruction for this exercise; discuss any changes to the shared instructions with the project manager.
Knowledge base: Full-text screening instructions set up
4. Open My tasks and the reference list
1. Select My tasks in the left sidebar. Under Full text screening, select To screen. The open pool banner appears instead of a reference count because you first need to claim records from the shared pool.
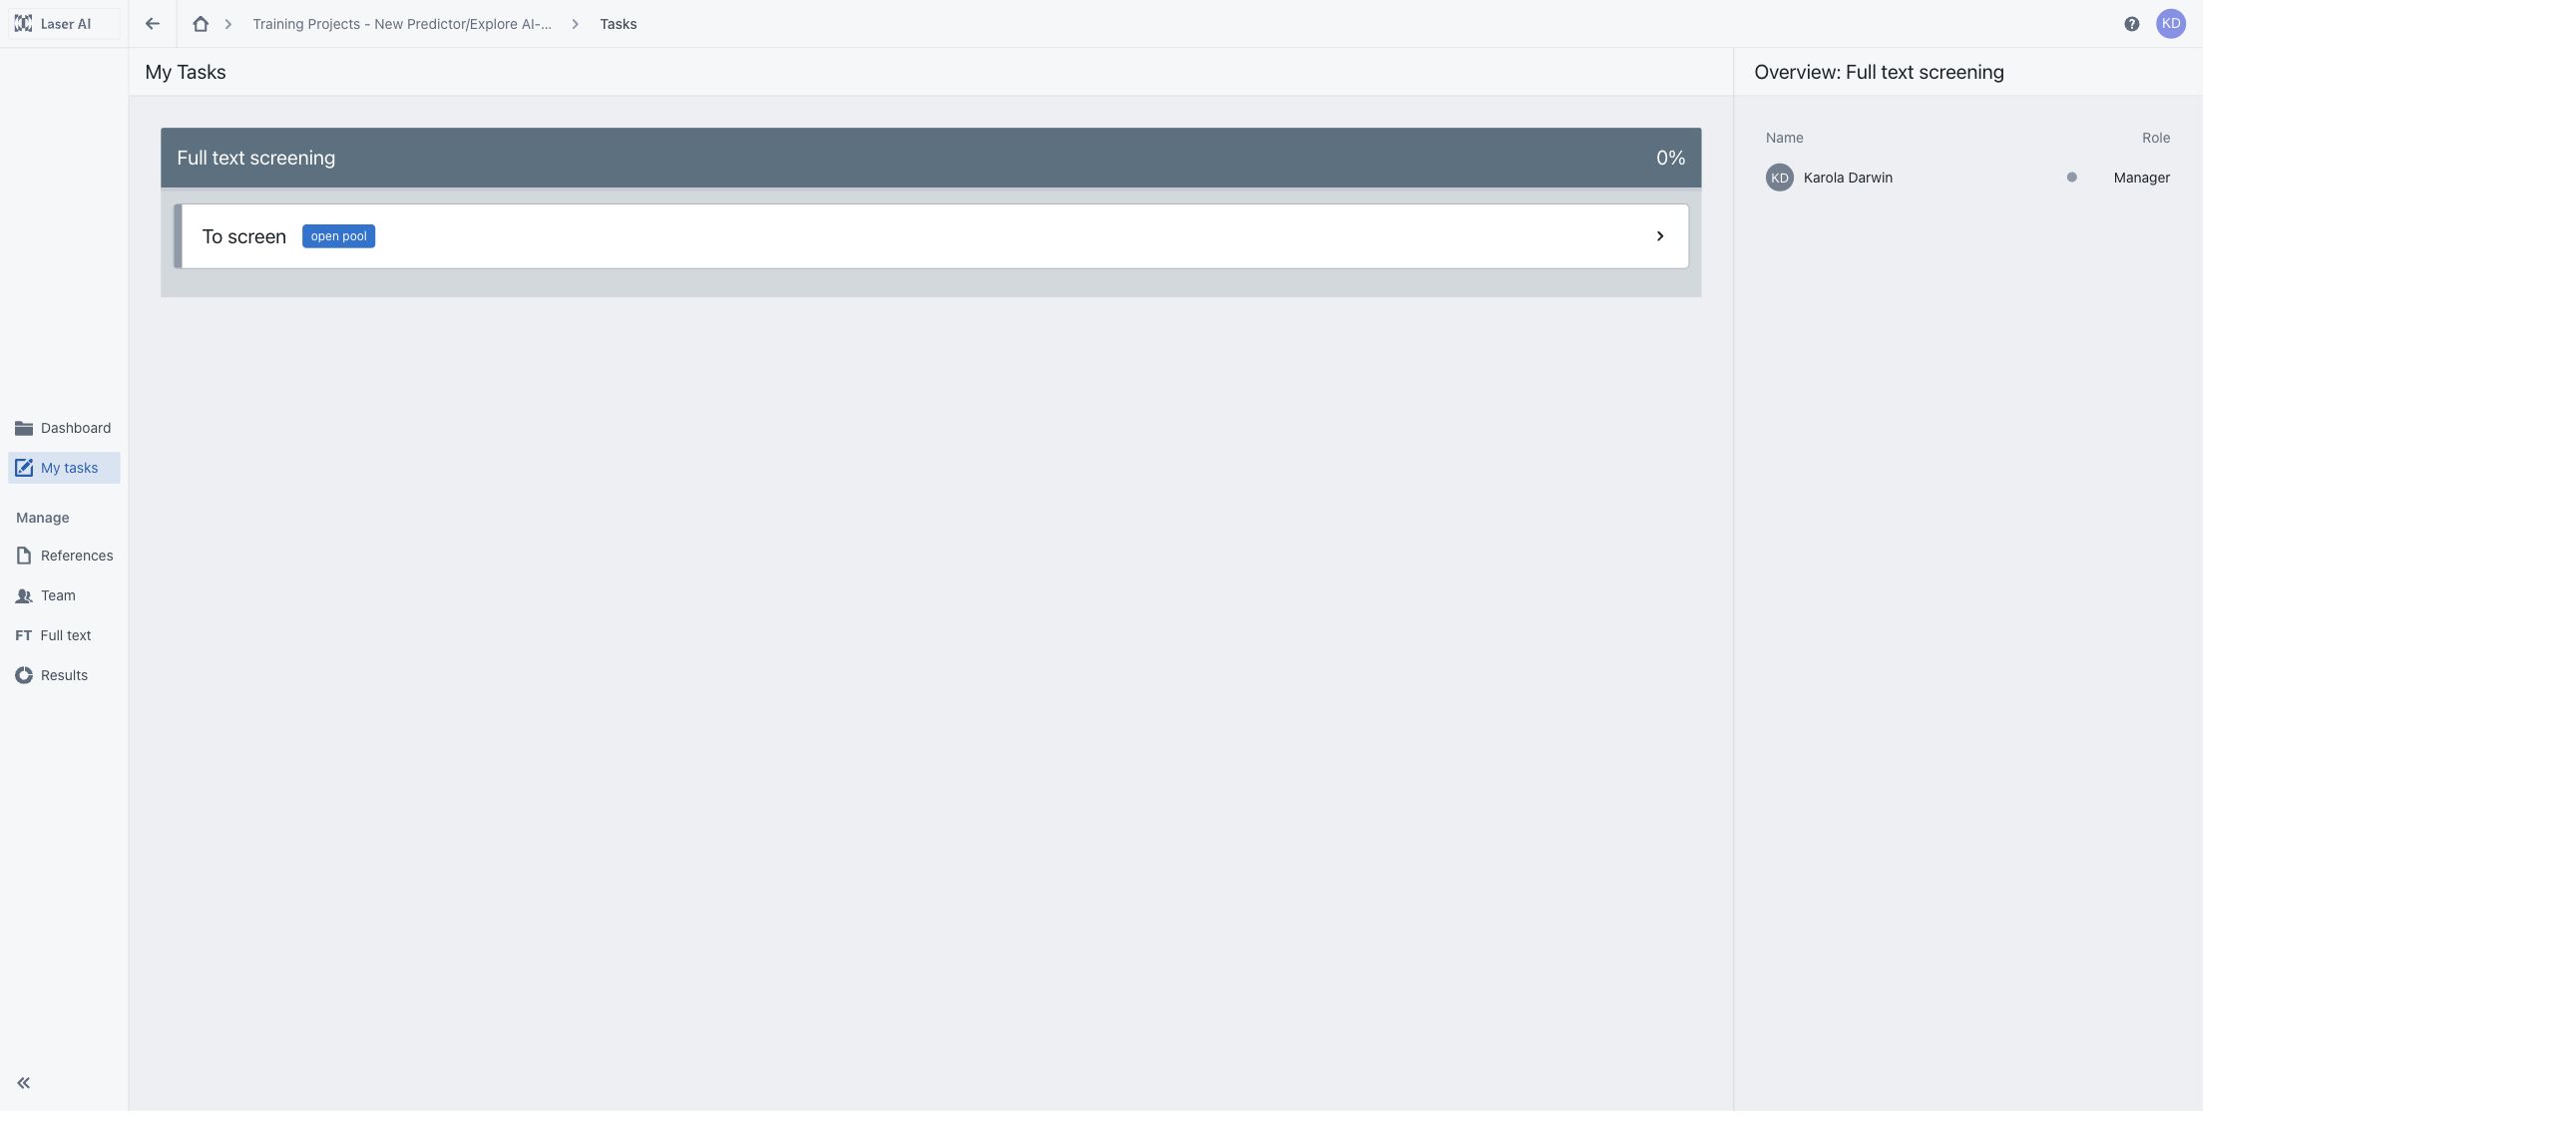
Figure 5. My tasks with the open pool banner beside To screen for Full text screening. Eligible team members can claim records without setting up distribution.
2. In the reference list, select Get new references and choose a small batch, such as Get 10 references. You can also select Search and get specific references and search for Bacharier to find the example used in this guide. Claimed records appear in your list, ready for screening. Claim only what you plan to assess, leaving records available for other participants.
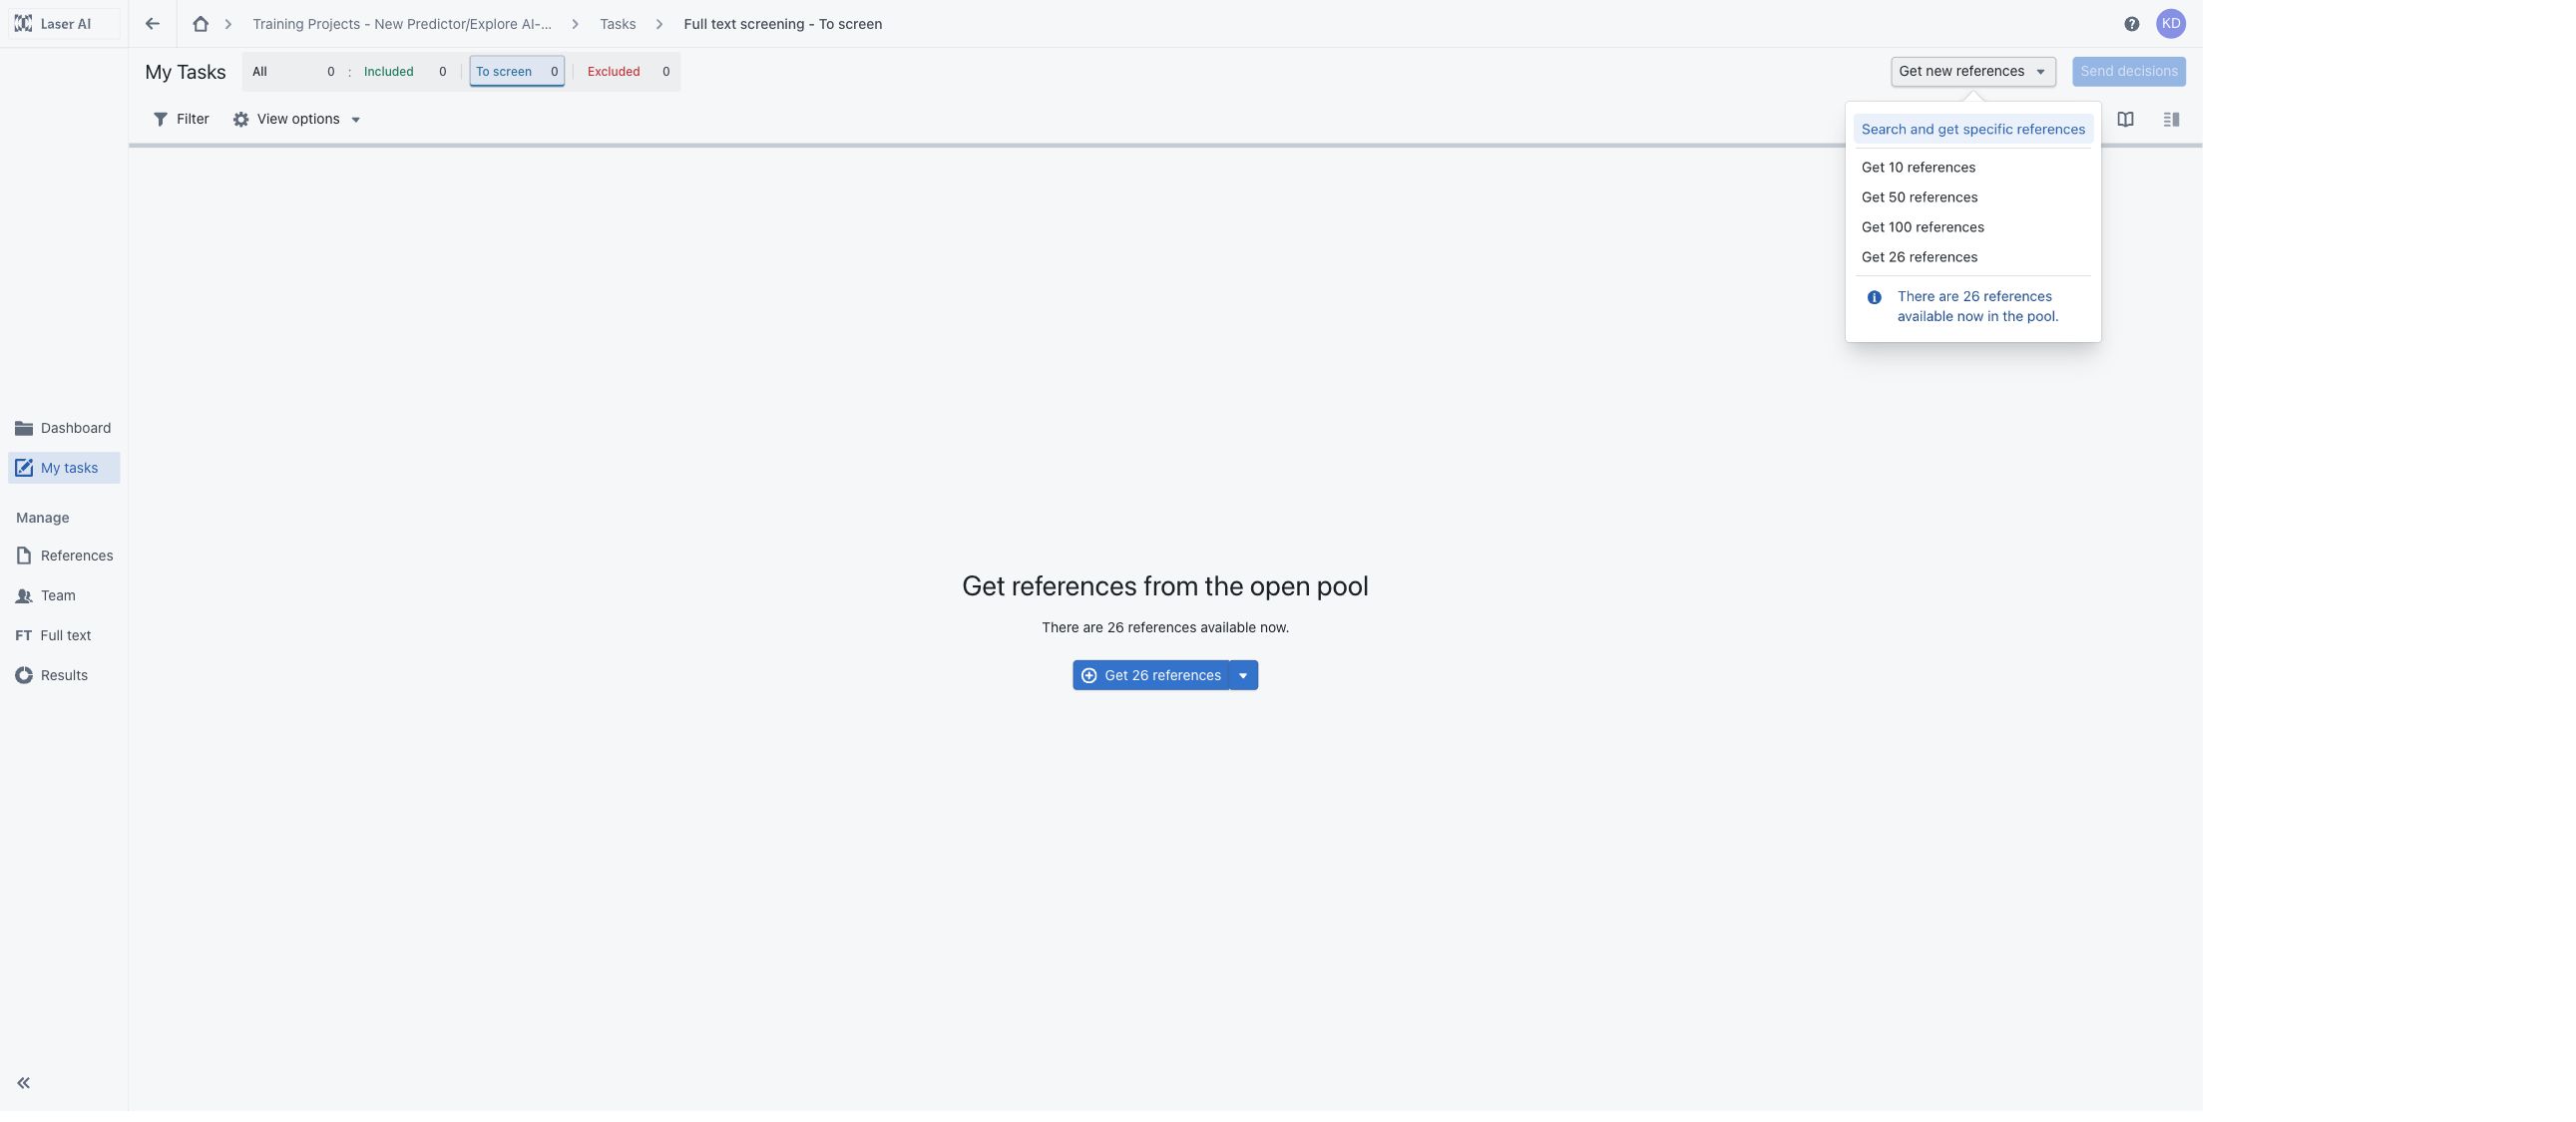
Figure 6. Get new references menu for claiming a small batch or searching for specific records from the FT open pool.
Knowledge base: How to start Full text screening
To enter Focus mode, double-click the highlighted record or select Open in the Decision column or at the top right. The PDF appears in the centre, with the screening panel on the right and navigation tools on the left.
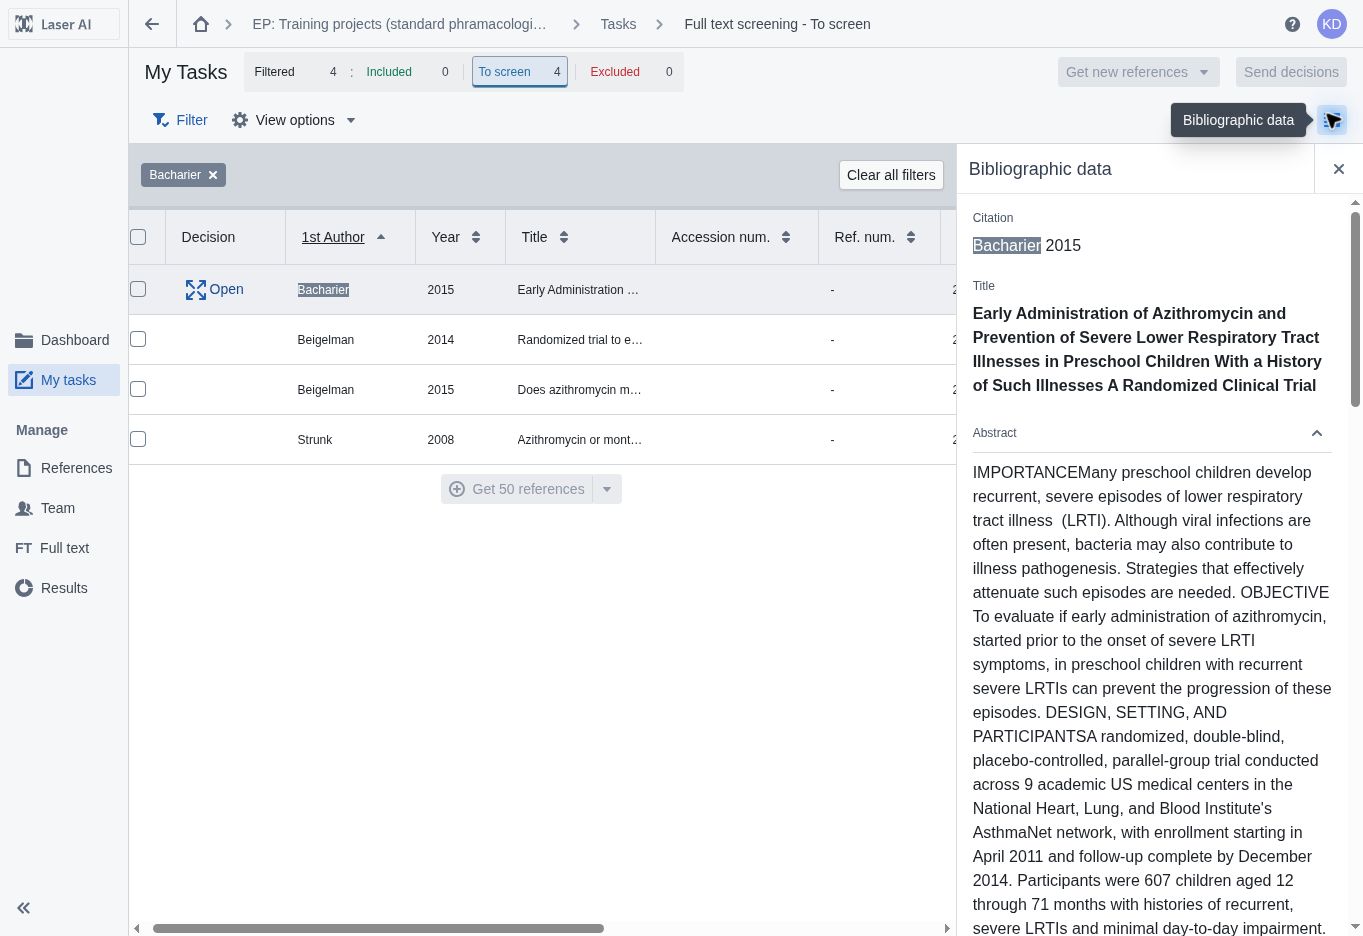
Figure 7. A claimed reference in the screening list, with the Open controls and Send decisions button — Bacharier 2015.
Knowledge base: Full text screening Focus mode
How to return unused records to the pool
1. Return to your reference list and select the checkbox beside each claimed record you want to release. Claim only what you plan to work on, and return unused records so colleagues can access them.
2. In the selection toolbar at the bottom, select Actions → Revert to the pool.
3. Read the confirmation and select Revert tasks to proceed, or Cancel to keep the records. All changes to the returned tasks will be lost, do not use this as a substitute for sending completed decisions.
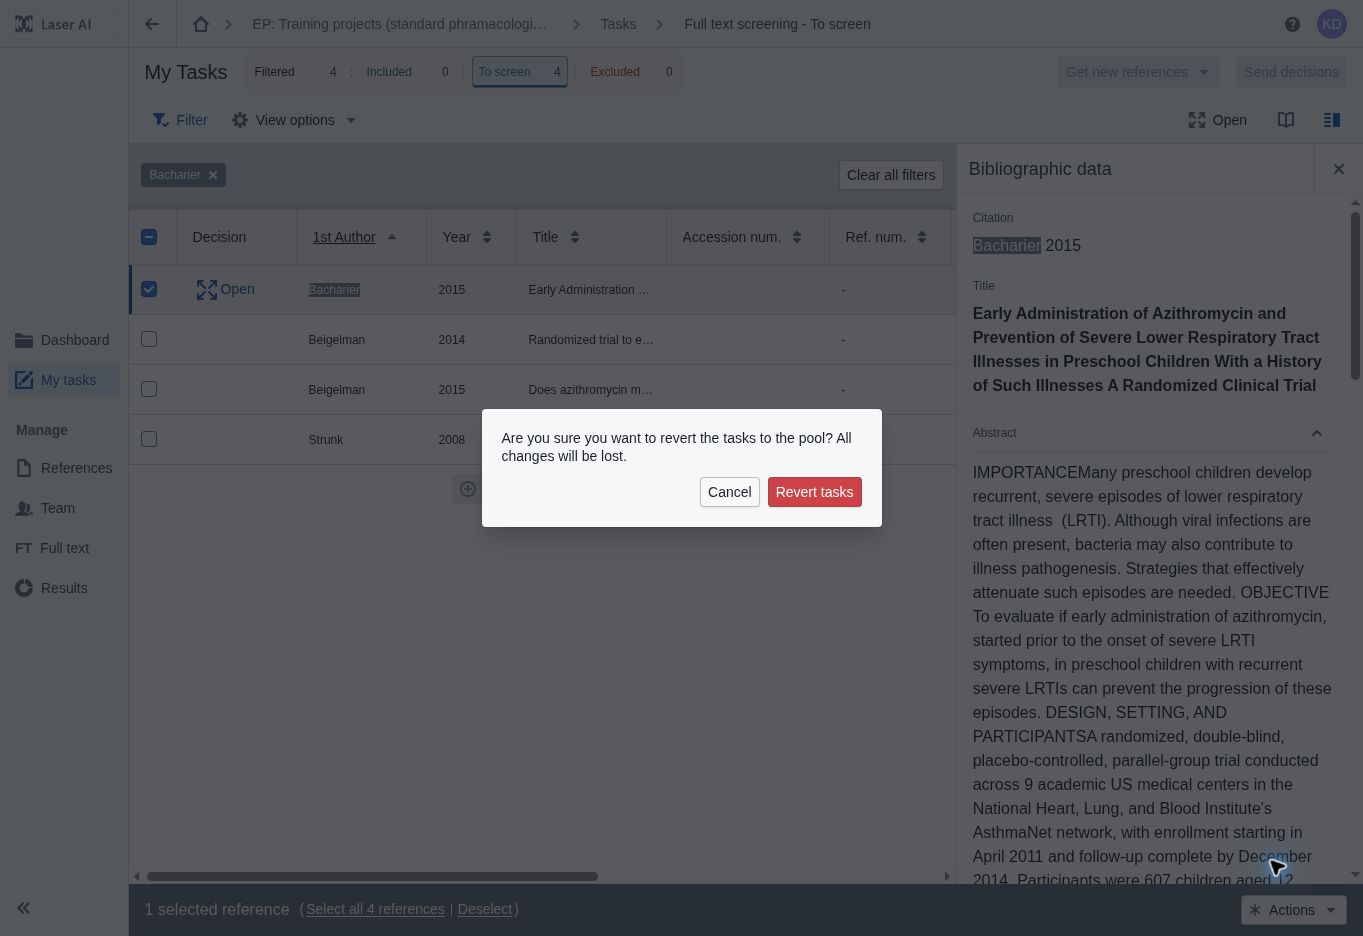
Figure 8. The confirmation warns that all changes will be lost when tasks are returned — Bacharier 2015.
The records leave your claimed list and become available to eligible team members again. You can claim records again later if they remain available.
Knowledge base: Open-pool claiming and Revert to the pool (illustrated in the TiAb guide)
5. Inspect AI suggestions in Logic view
In Focus mode, select Logic in the right panel. Open a criterion to inspect its question, the suggested response and the AI rationale.
1. Read the relevant PDF passage and its surrounding context. Selecting a criterion can take you to the supporting passage and display linked highlights.
2. Compare the response with the screening instruction. Check that the evidence applies to this publication and to the correct study, population and intervention. If you disagree, select the response supported by the article. Check the resulting Decision at the bottom, then select Apply to record it. Ctrl + Enter applies the current decision.
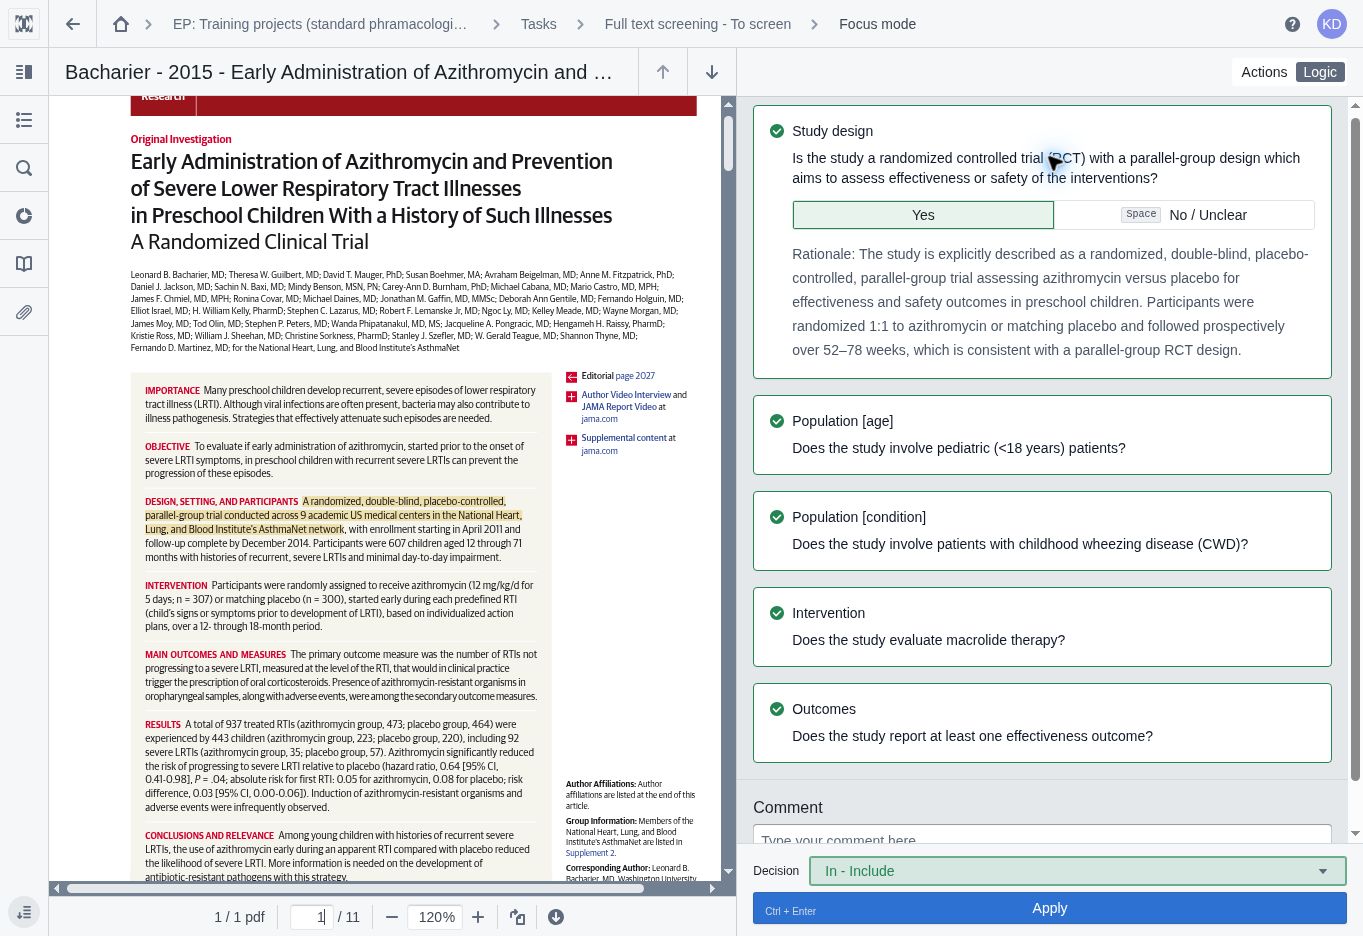
Figure 9. Logic view with a criterion, its AI rationale, the source PDF.
Knowledge base: AI-supported full text screening
6. Make decisions in Actions view
Select Actions to see the overall AI suggestion and the inclusion and exclusion choices. The AI marker identifies the suggested action. Review the full text before accepting it or choosing a different decision.
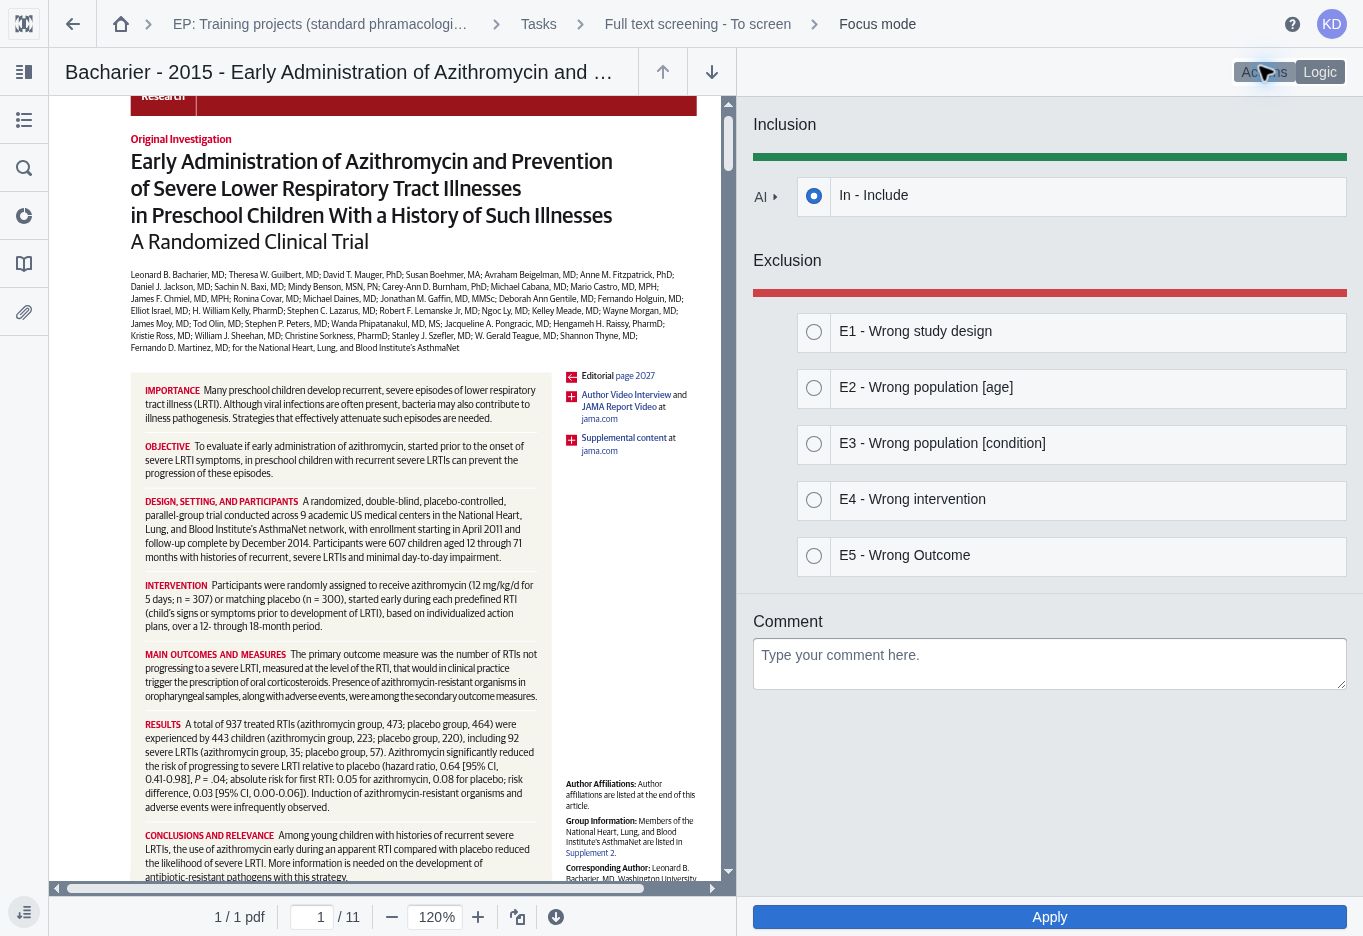
Figure 10. Actions view with the overall AI suggestion and the prepared exclusion reasons.
Choose the appropriate action, add a Comment where useful, and select Apply. A comment can explain uncertainty or why your decision differs from the AI suggestion. Use tags if provided by the project instructions.
Ctrl + Enter records the current decision. It should follow your assessment of the PDF, rather than be used to accept suggestions without checking them.
Knowledge base: How to perform Full text screening
7. Review and send your decisions
1. Return to the reference list using Back or the Full text screening breadcrumb.
2. Review your Included and Excluded records. Reopen any record requiring correction before submitting the batch.
3. When satisfied, select Send decisions. Please note that Apply records an individual decision; Send decisions submits the recorded decisions. These are separate steps.
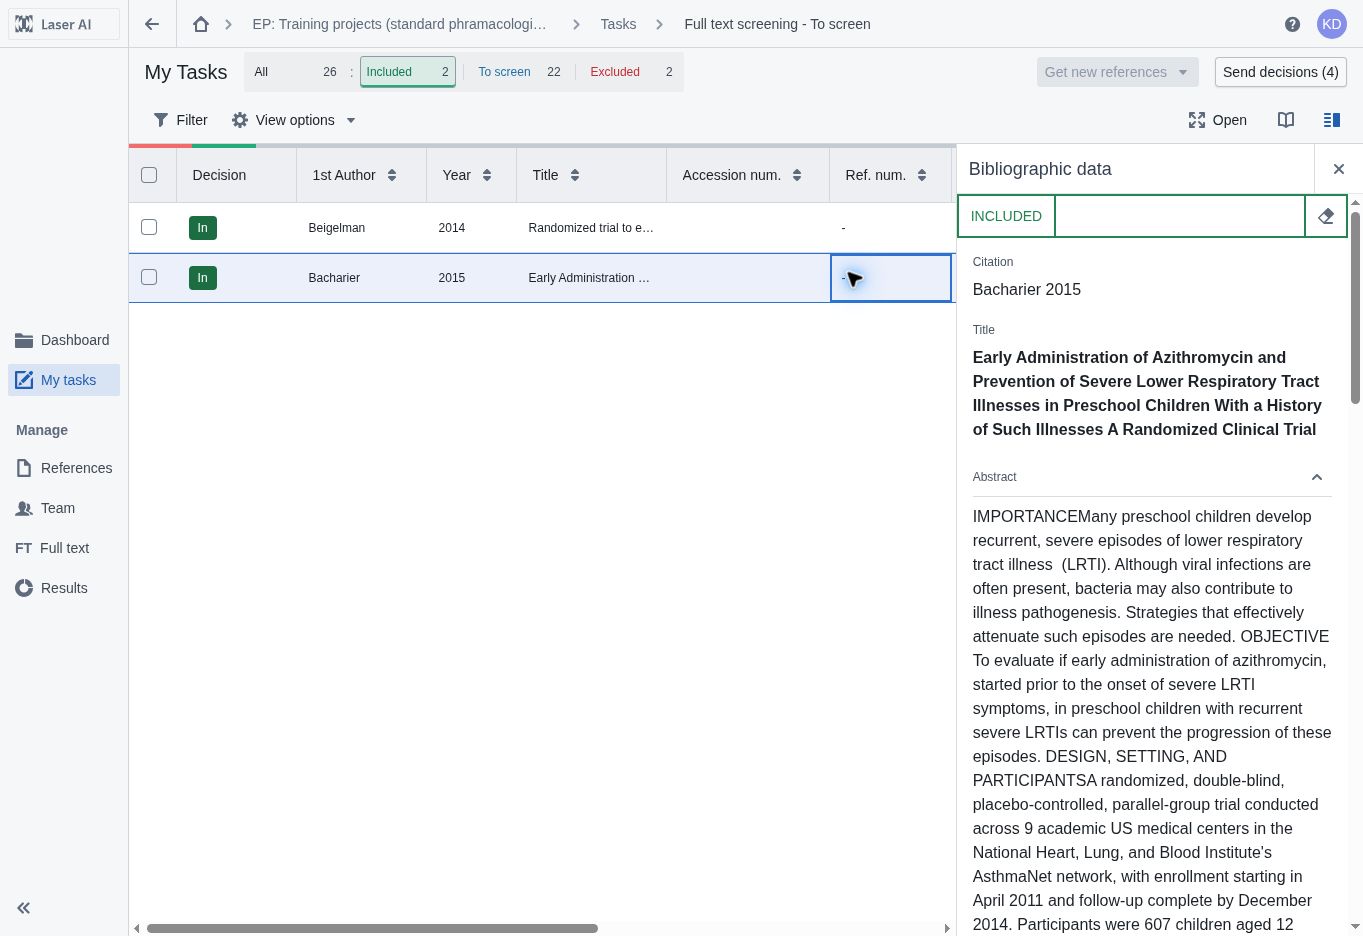
Figure 11. Screening reference list with recorded decisions and the Send decisions (4) button at the top right.
4. Return to My tasks and check completed work and the remaining workload. After sending, corrections may require a project manager with the appropriate permissions.
You do not need to assess all records in one session. Send only decisions you have checked, then claim more records when ready.
Knowledge base: How to perform Full text screening — reviewing and sending decisions
8. Customize the view and continue exploring
Use the PDF tools to make the article easier to inspect: adjust zoom, enter a page number, use Search in PDF file, or open the Table of contents where available. 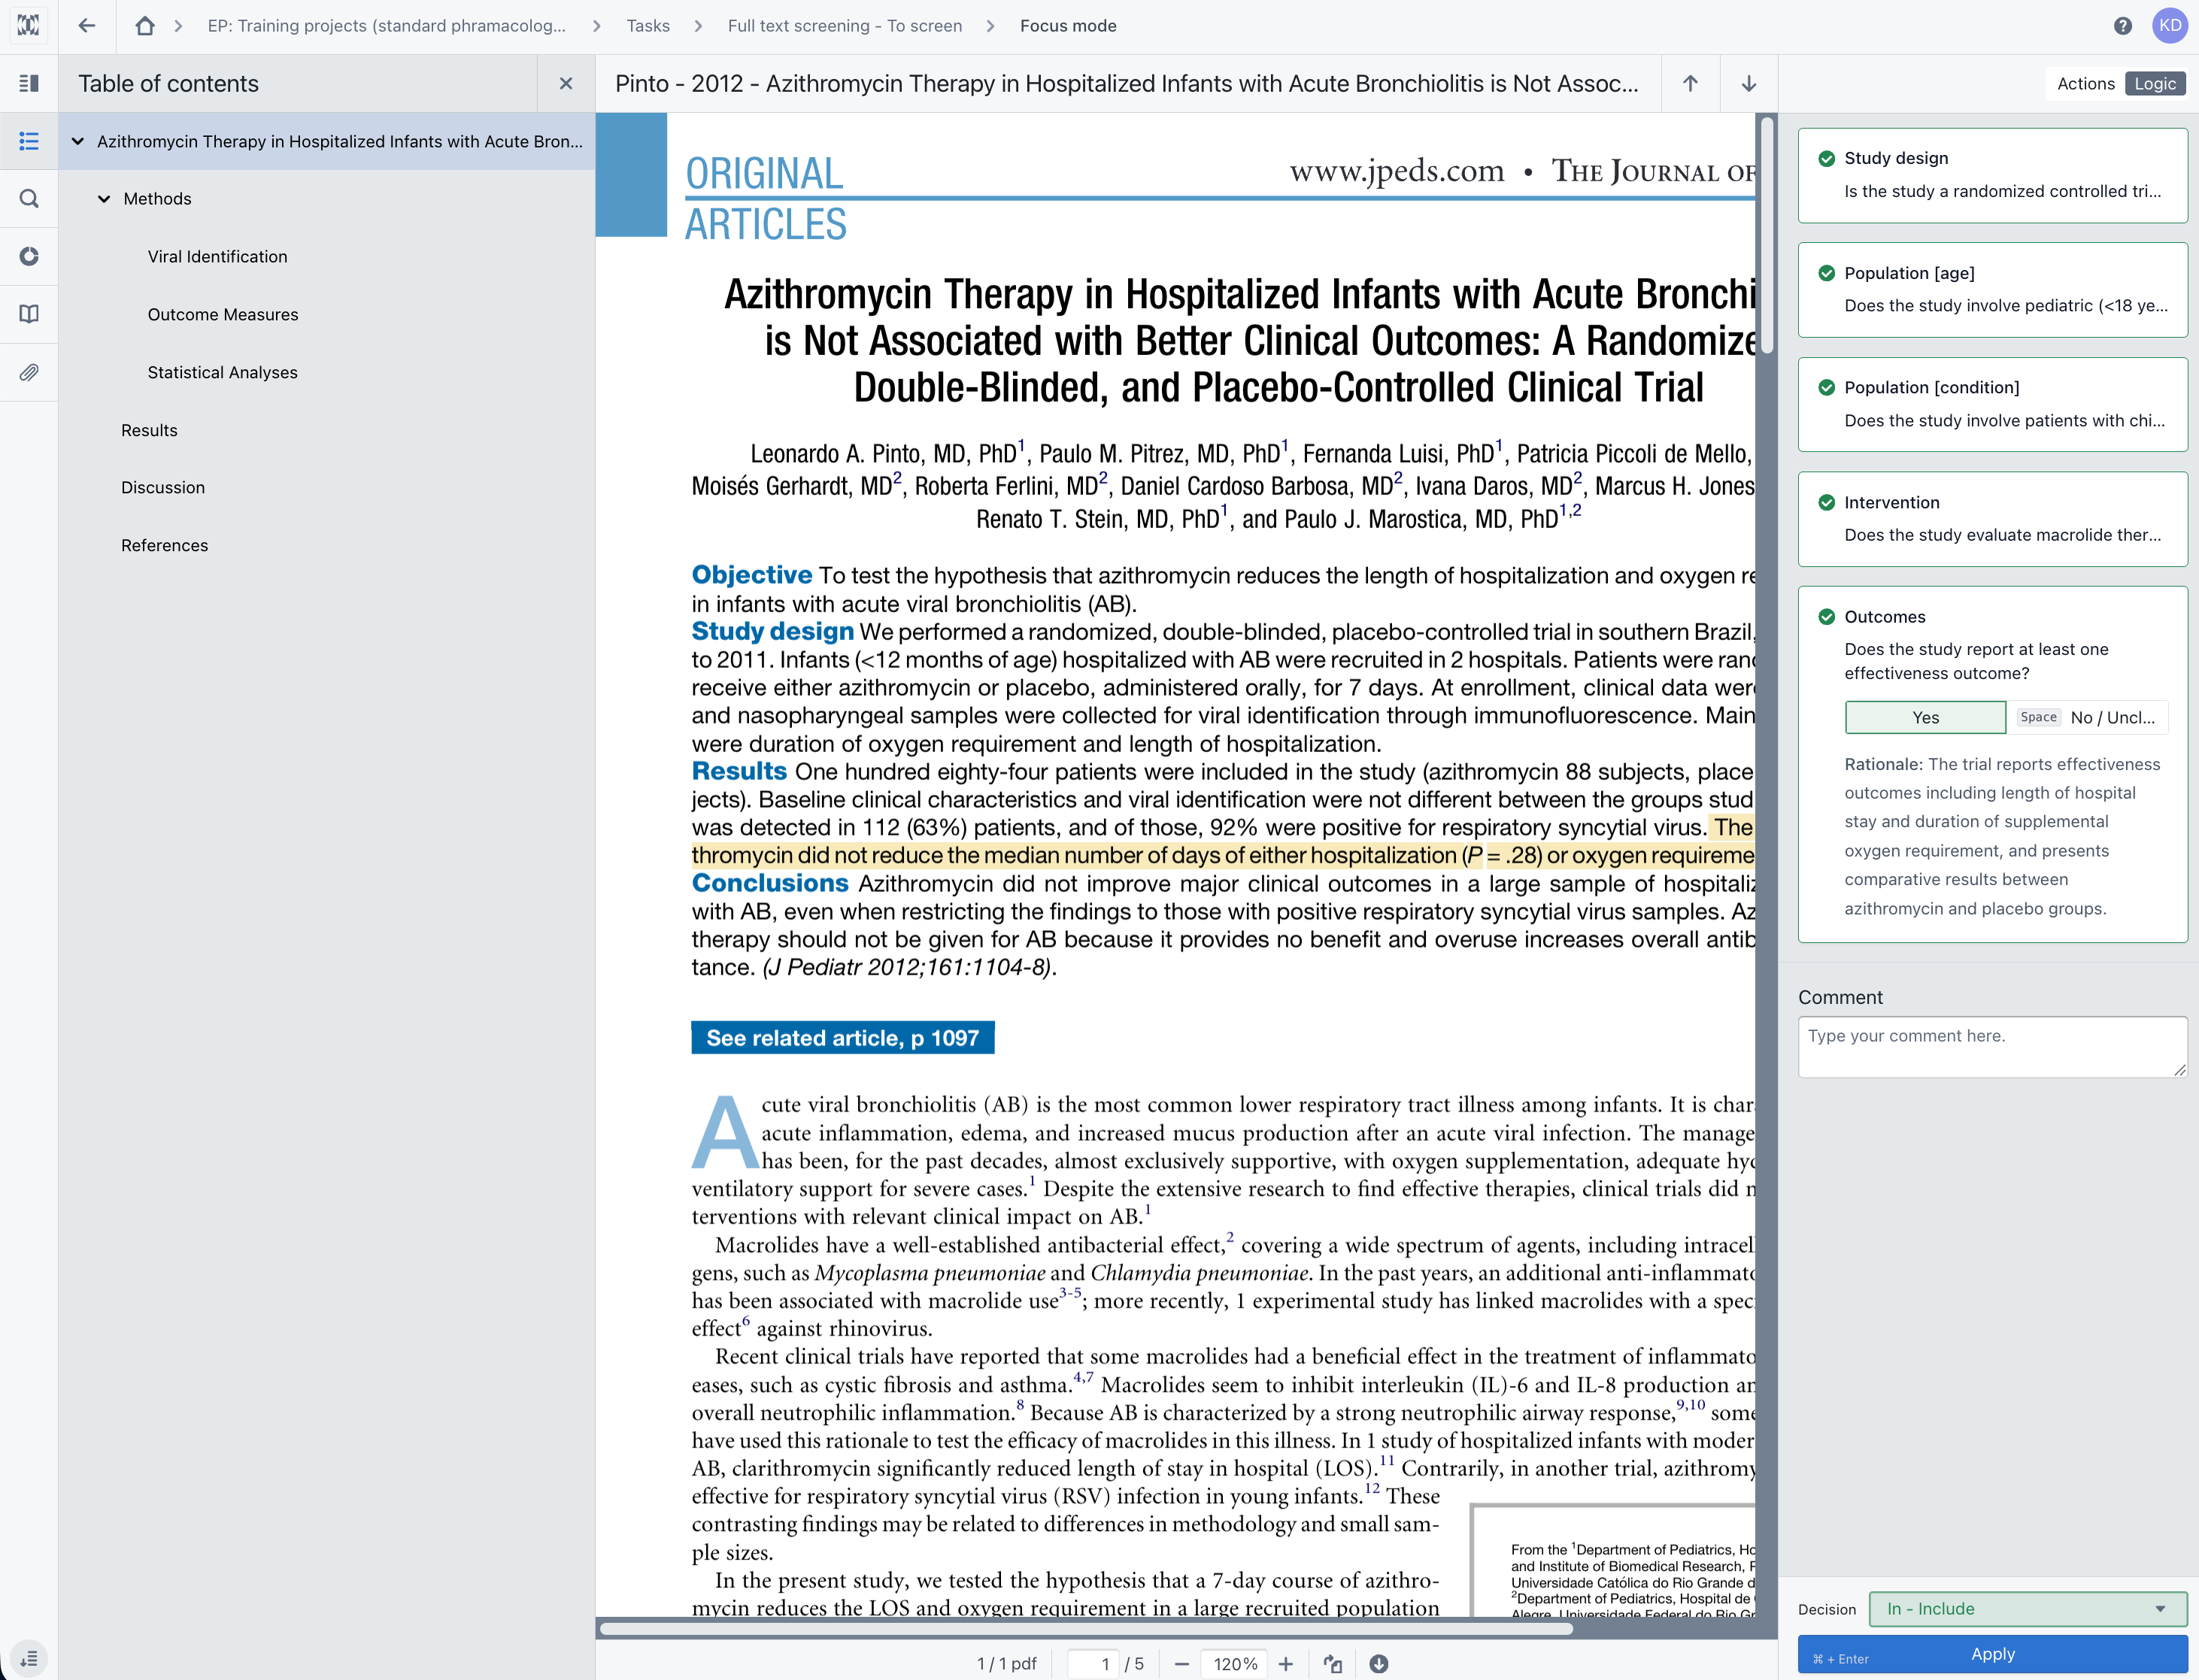
Figure 12. Table of contents and PDF navigation tools in Full-text screening Focus mode.
Open Instruction whenever you need to revisit the criteria.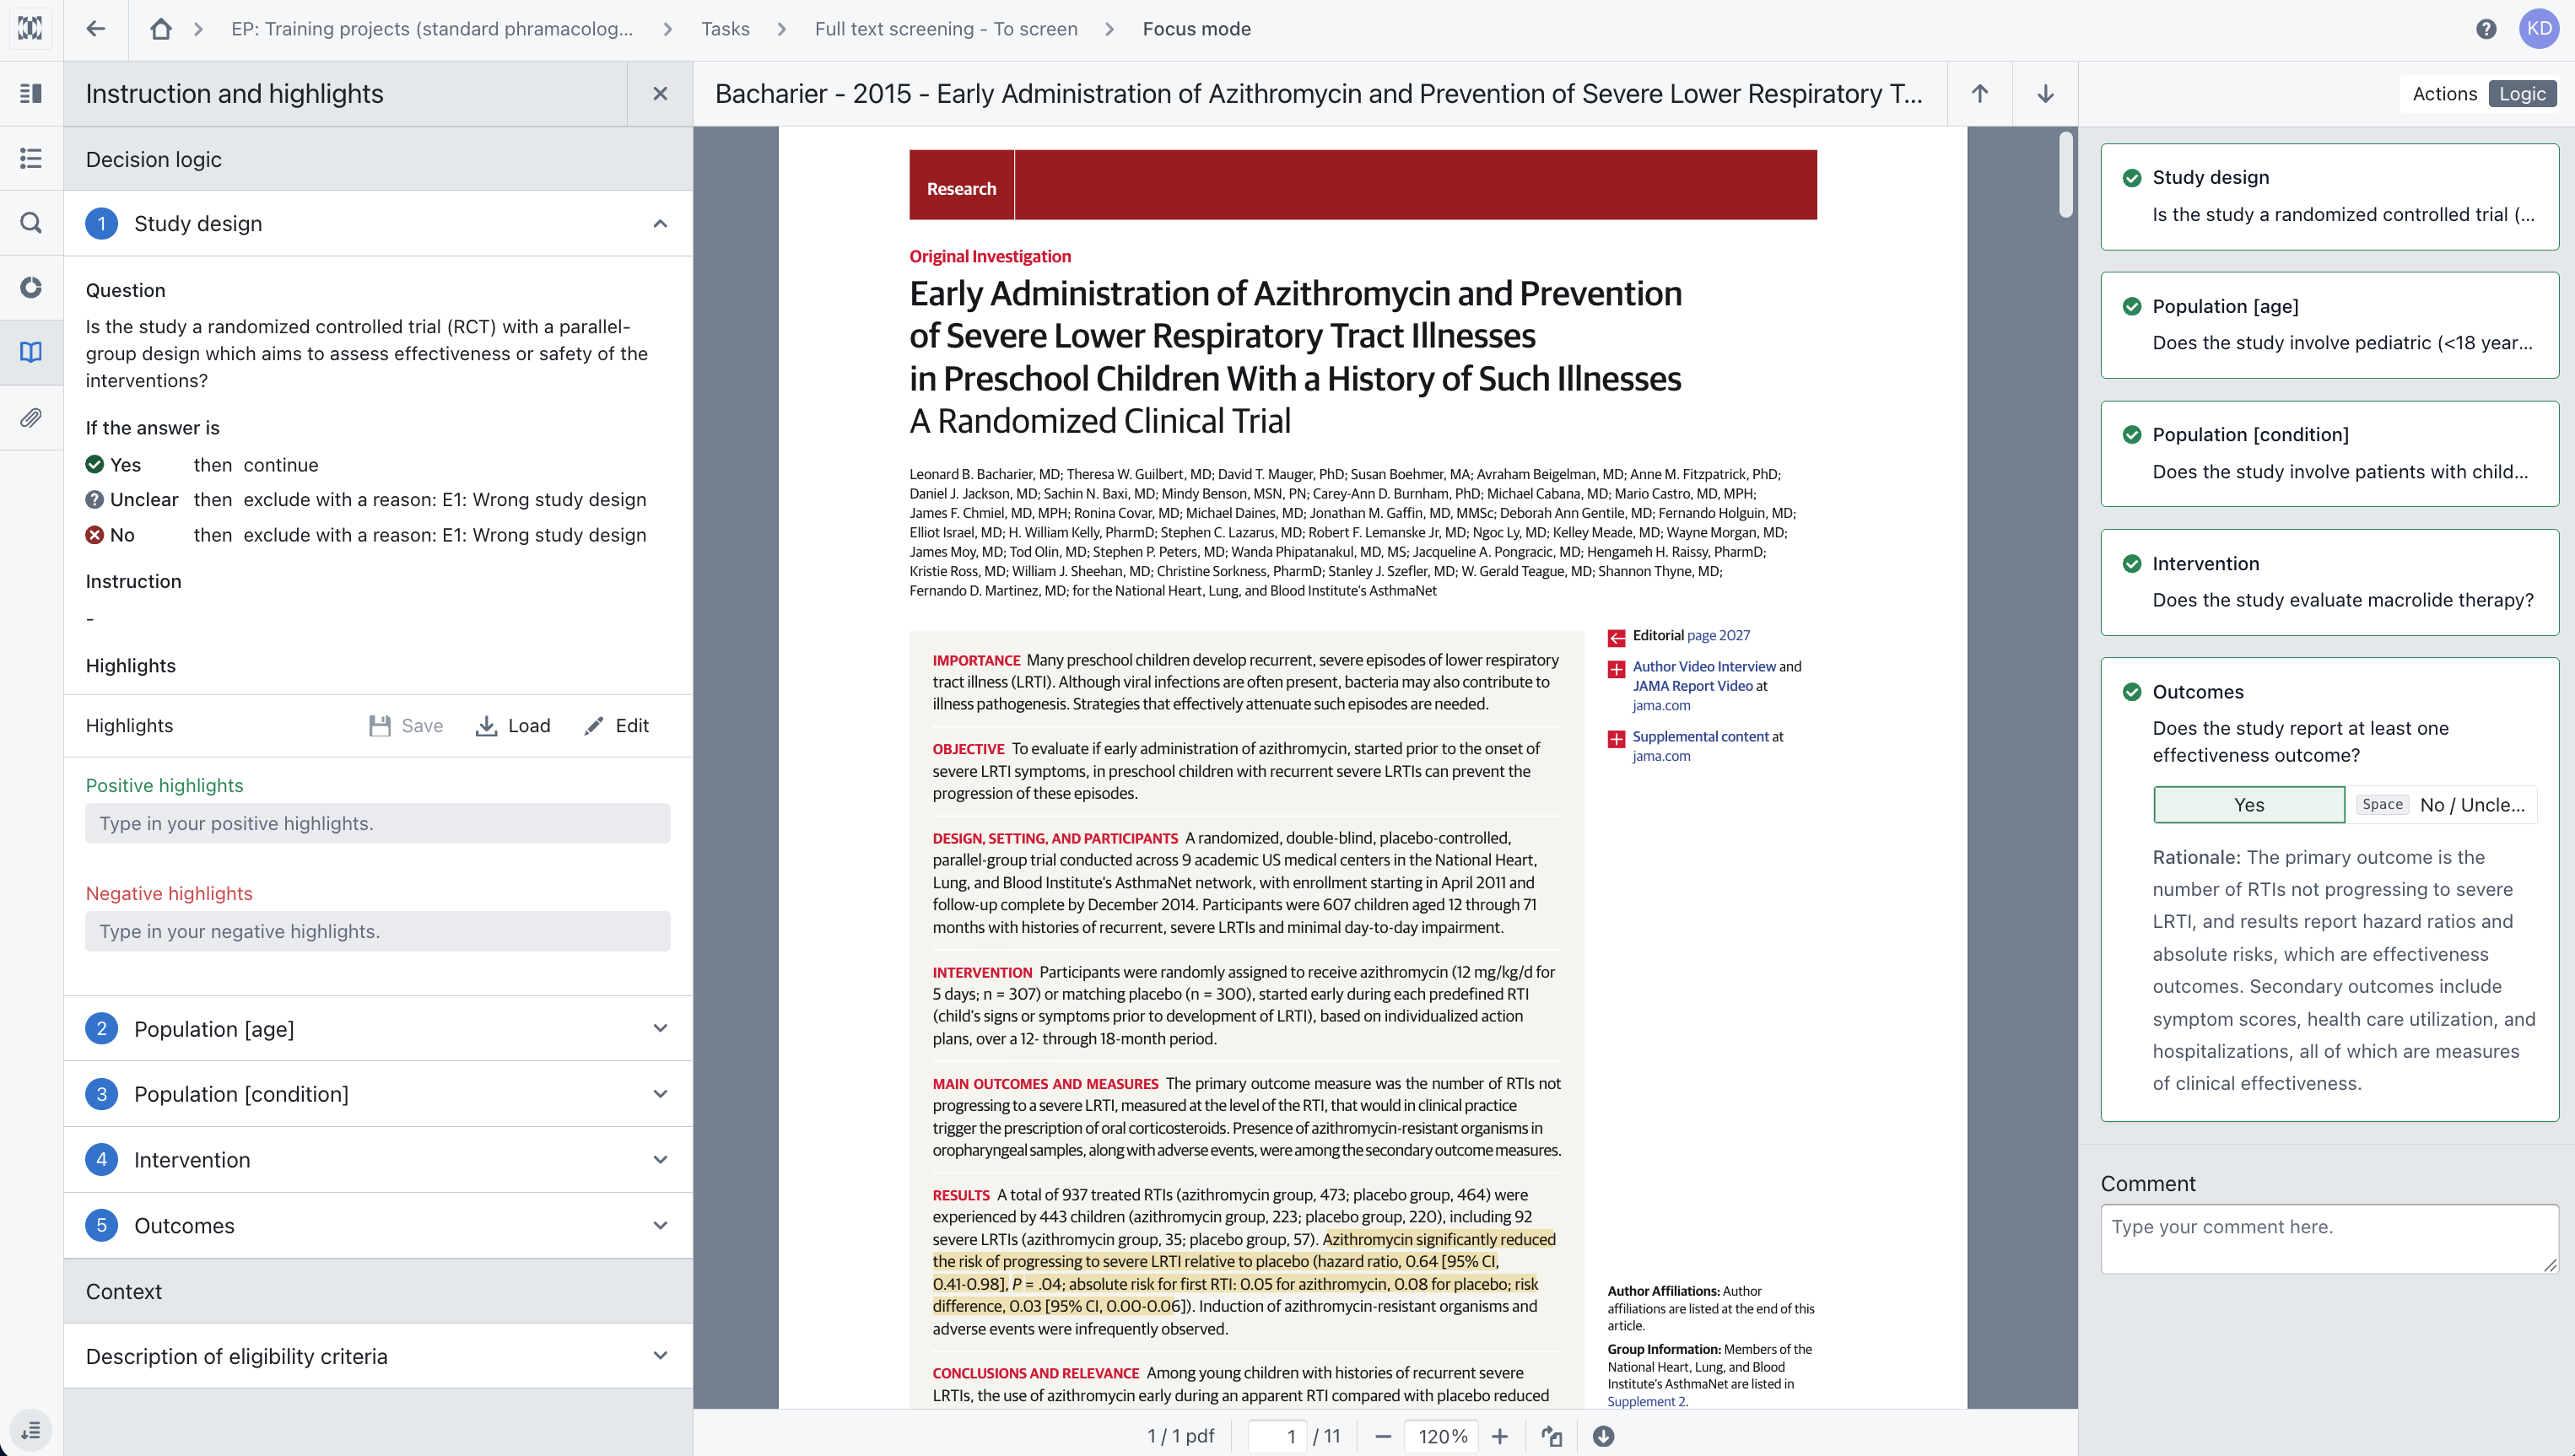
Figure 13. Instruction and highlights panel displaying the study-design question and answer mapping alongside the PDF.
PDF attachments lists the attached files. If an article has supplementary material, inspect it and use the PDF navigation controls to move between attachments.
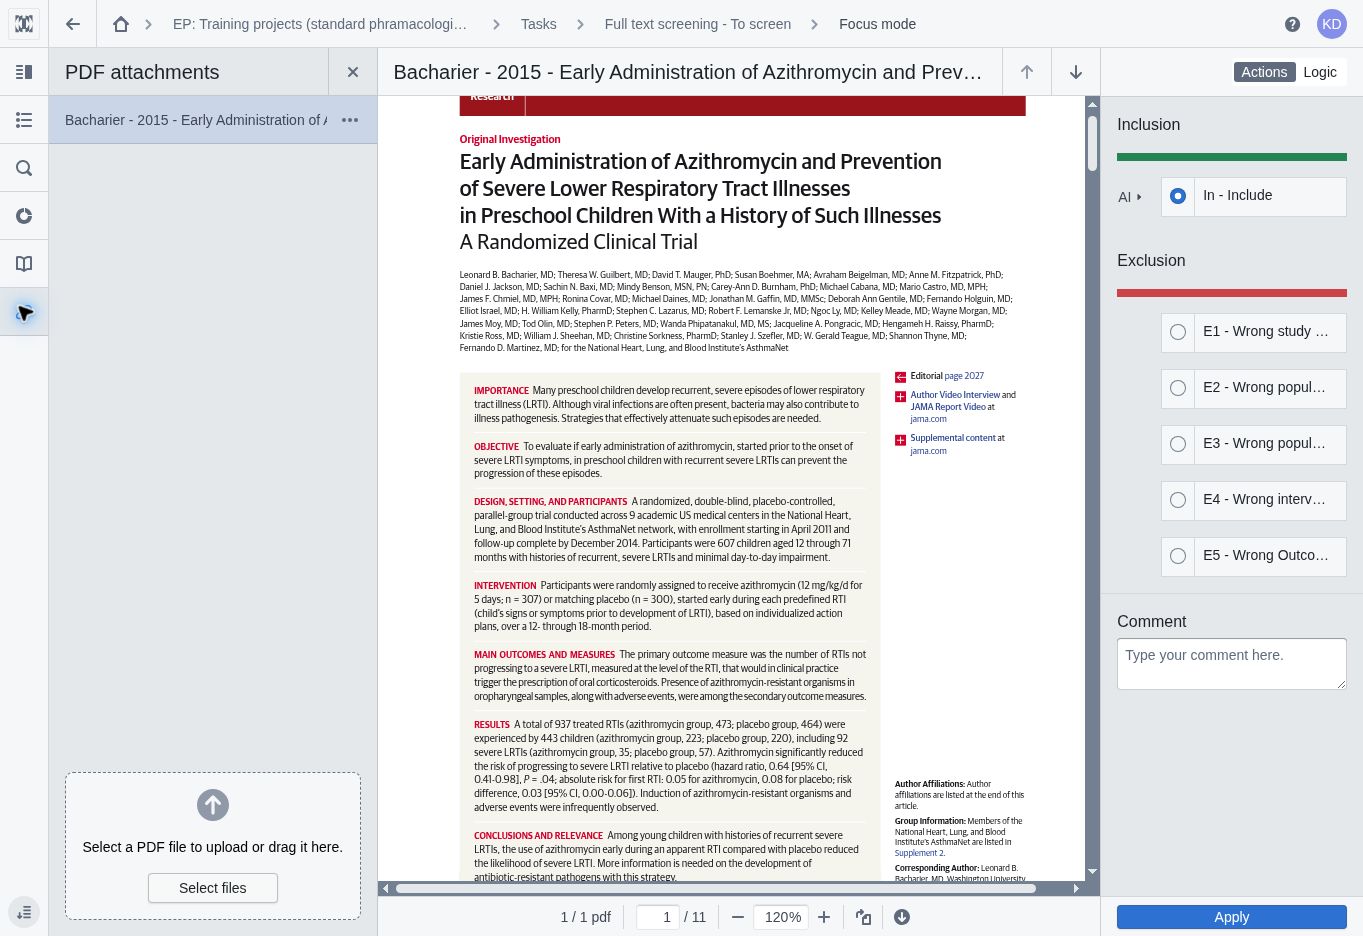
Figure 14. PDF attachments and document navigation tools alongside the screening actions — Bacharier 2015.
Knowledge base: PDF attachments in the Full text screening Focus mode
In the reference list, use Filter to inspect records by AI suggestion, decision code, publication year, comments, tags or decision-logic answers. Use column headings to sort the list, and clear filters when returning to your full claimed set.
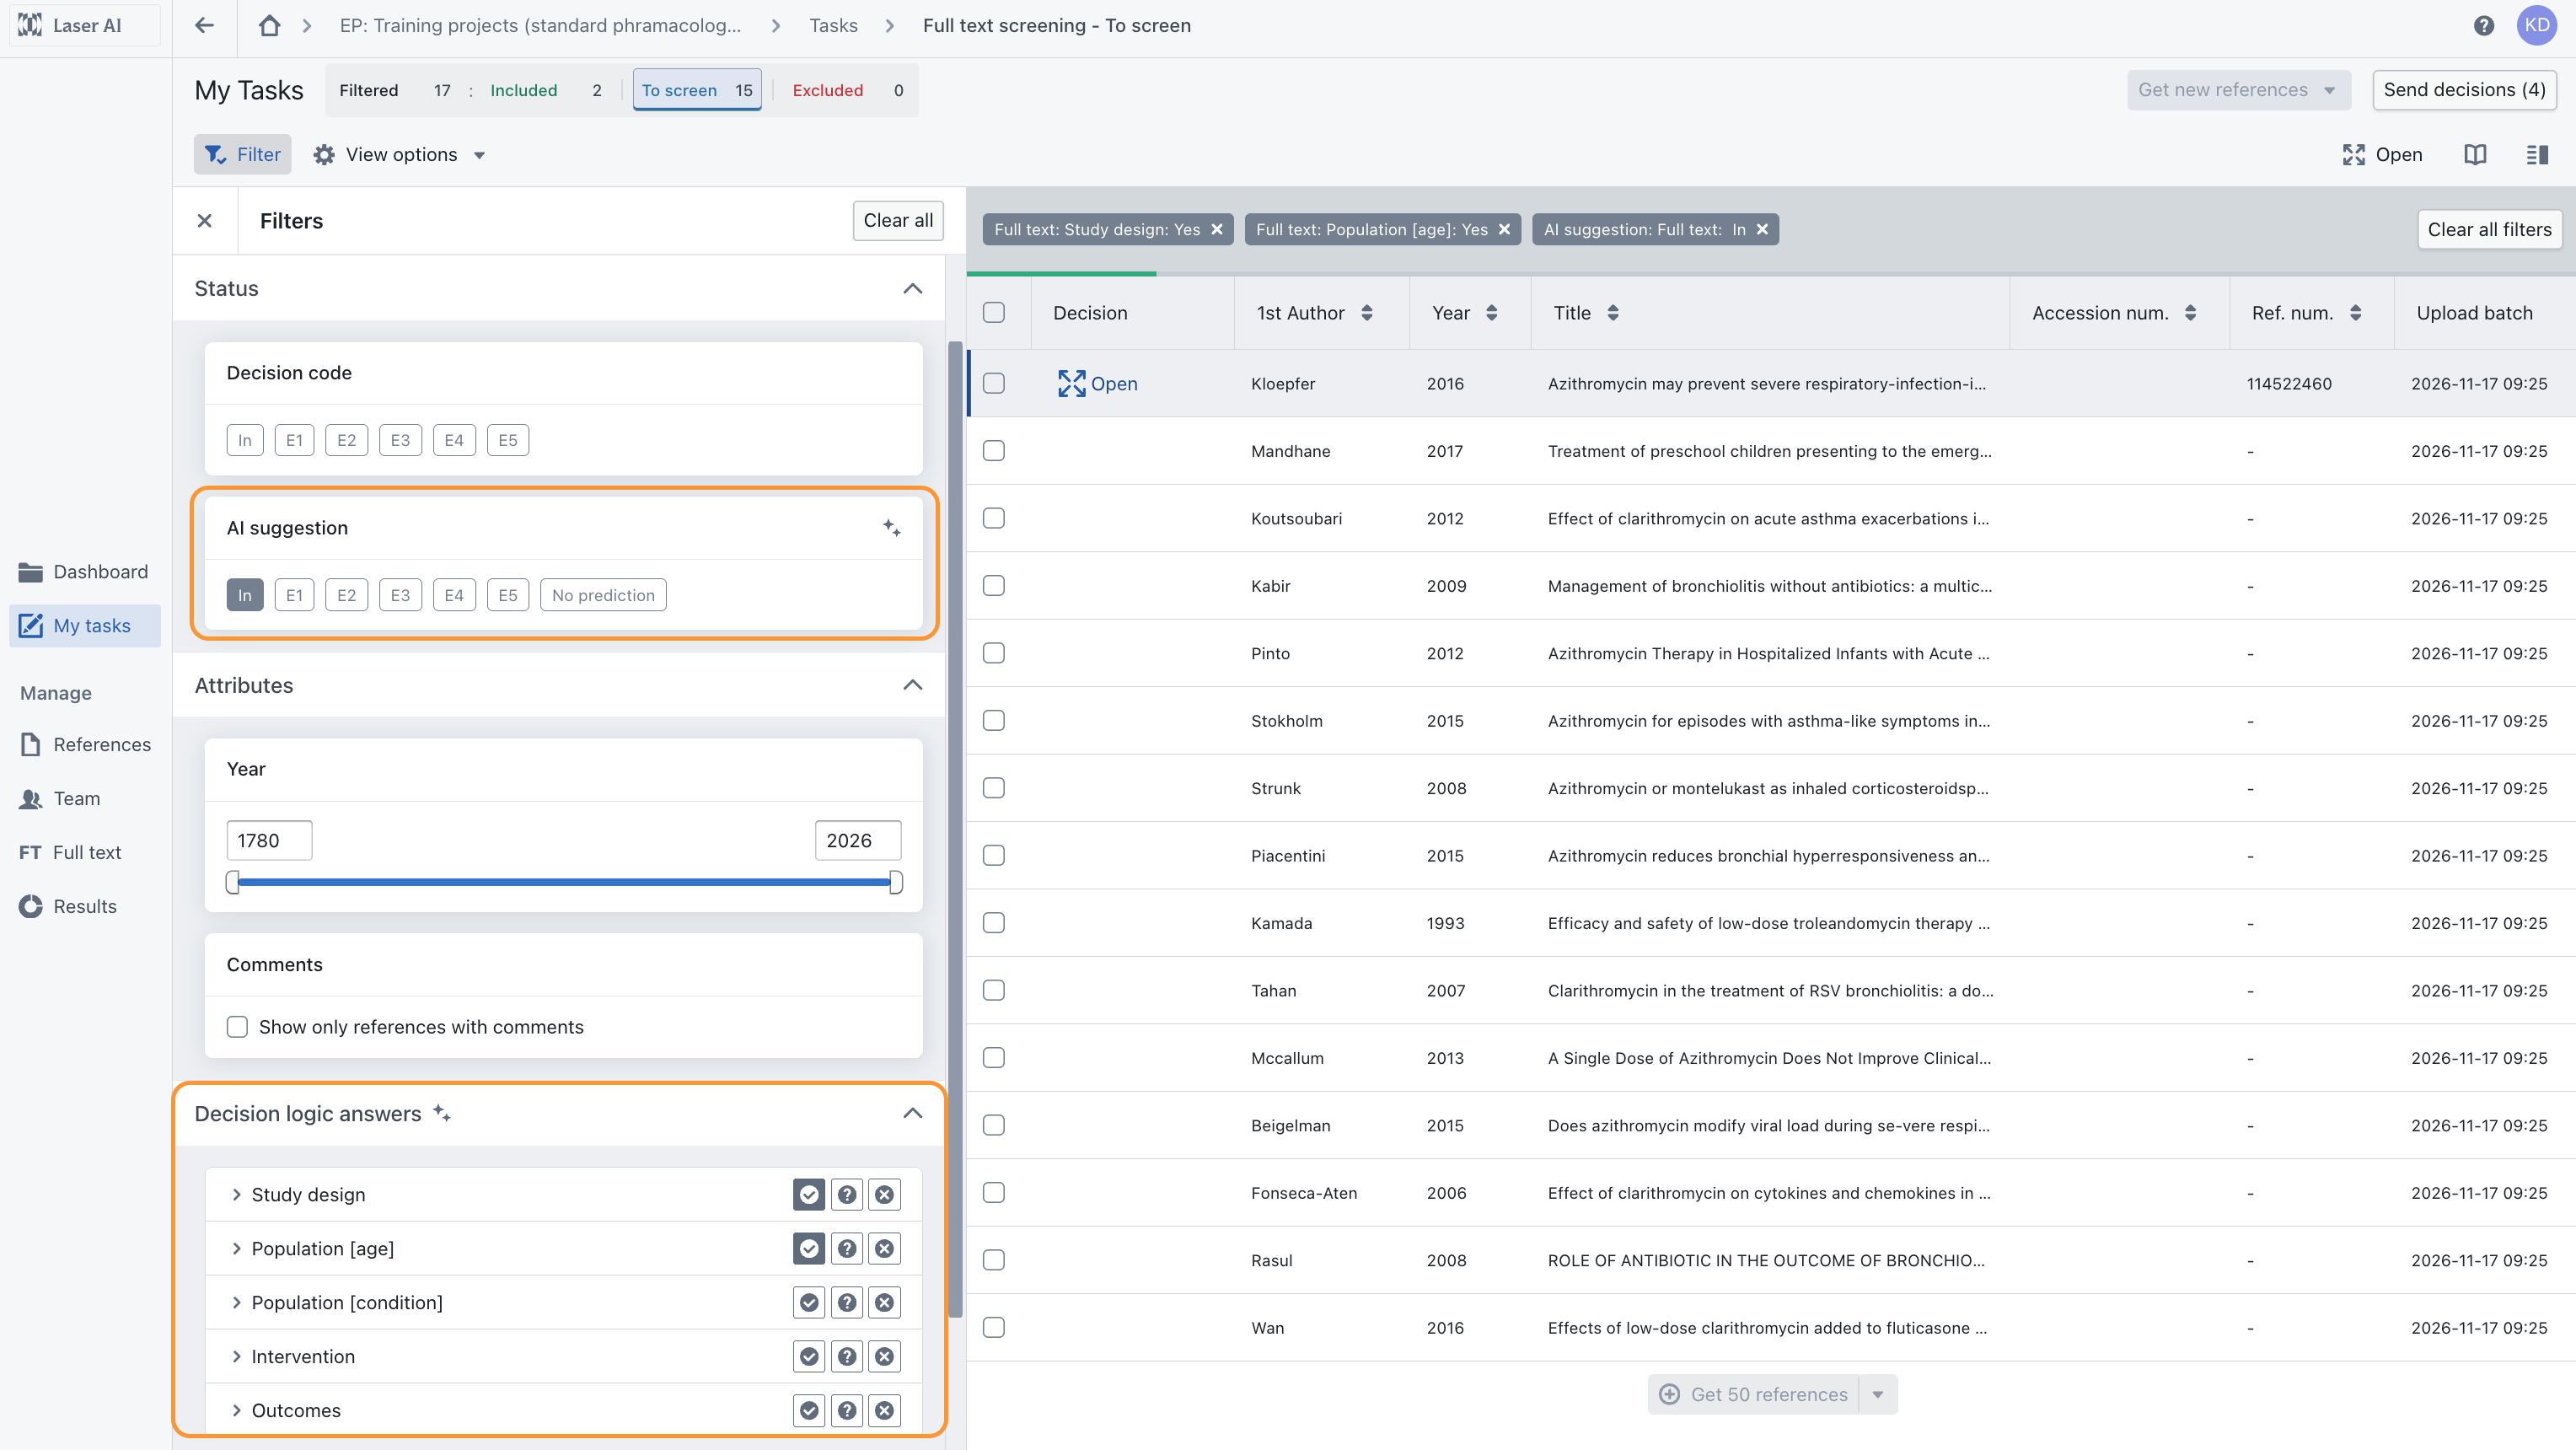
Figure 15. Reference-list filters for overall AI suggestions and answers to individual decision-logic questions.
Knowledge base: Filtering and sorting in Full text screening
Suggested training activities
Try the following exercises with a small number of records:
- Inspect an inclusion suggestion and an exclusion suggestion in both Actions and Logic views.
- Compare each AI rationale with the original PDF, checking that it describes the publication being screened.
- Find a record with missing or ambiguous information and check how the prepared FT logic handles it.
- Practise searching for and claiming a specific record, then return an unused record to the pool.
- Add a useful comment, review your decisions, and submit a checked batch using Send decisions.
- Return to the Full text stage dashboard to inspect progress.
Generate Full Text screening instructions
As an optional additional activity, try creating full-text screening instructions in a separate practice project. The training project already has prepared instructions, so this is not required before screening.
There are two ways to generate FT instructions: generate them de novo from the project description, or adapt existing TiAb screening instructions. Adaptation is only available when both TiAb and FT screening stages are enabled in the same project and the TiAb instructions are already prepared.
Start the instruction setup
1. Open Full text under Manage and select Set up screening criteria to begin setting up instructions in your practice project.
2. On the AI assistance level screen, select Decision hints and Actions + Decision logic, then select Next.
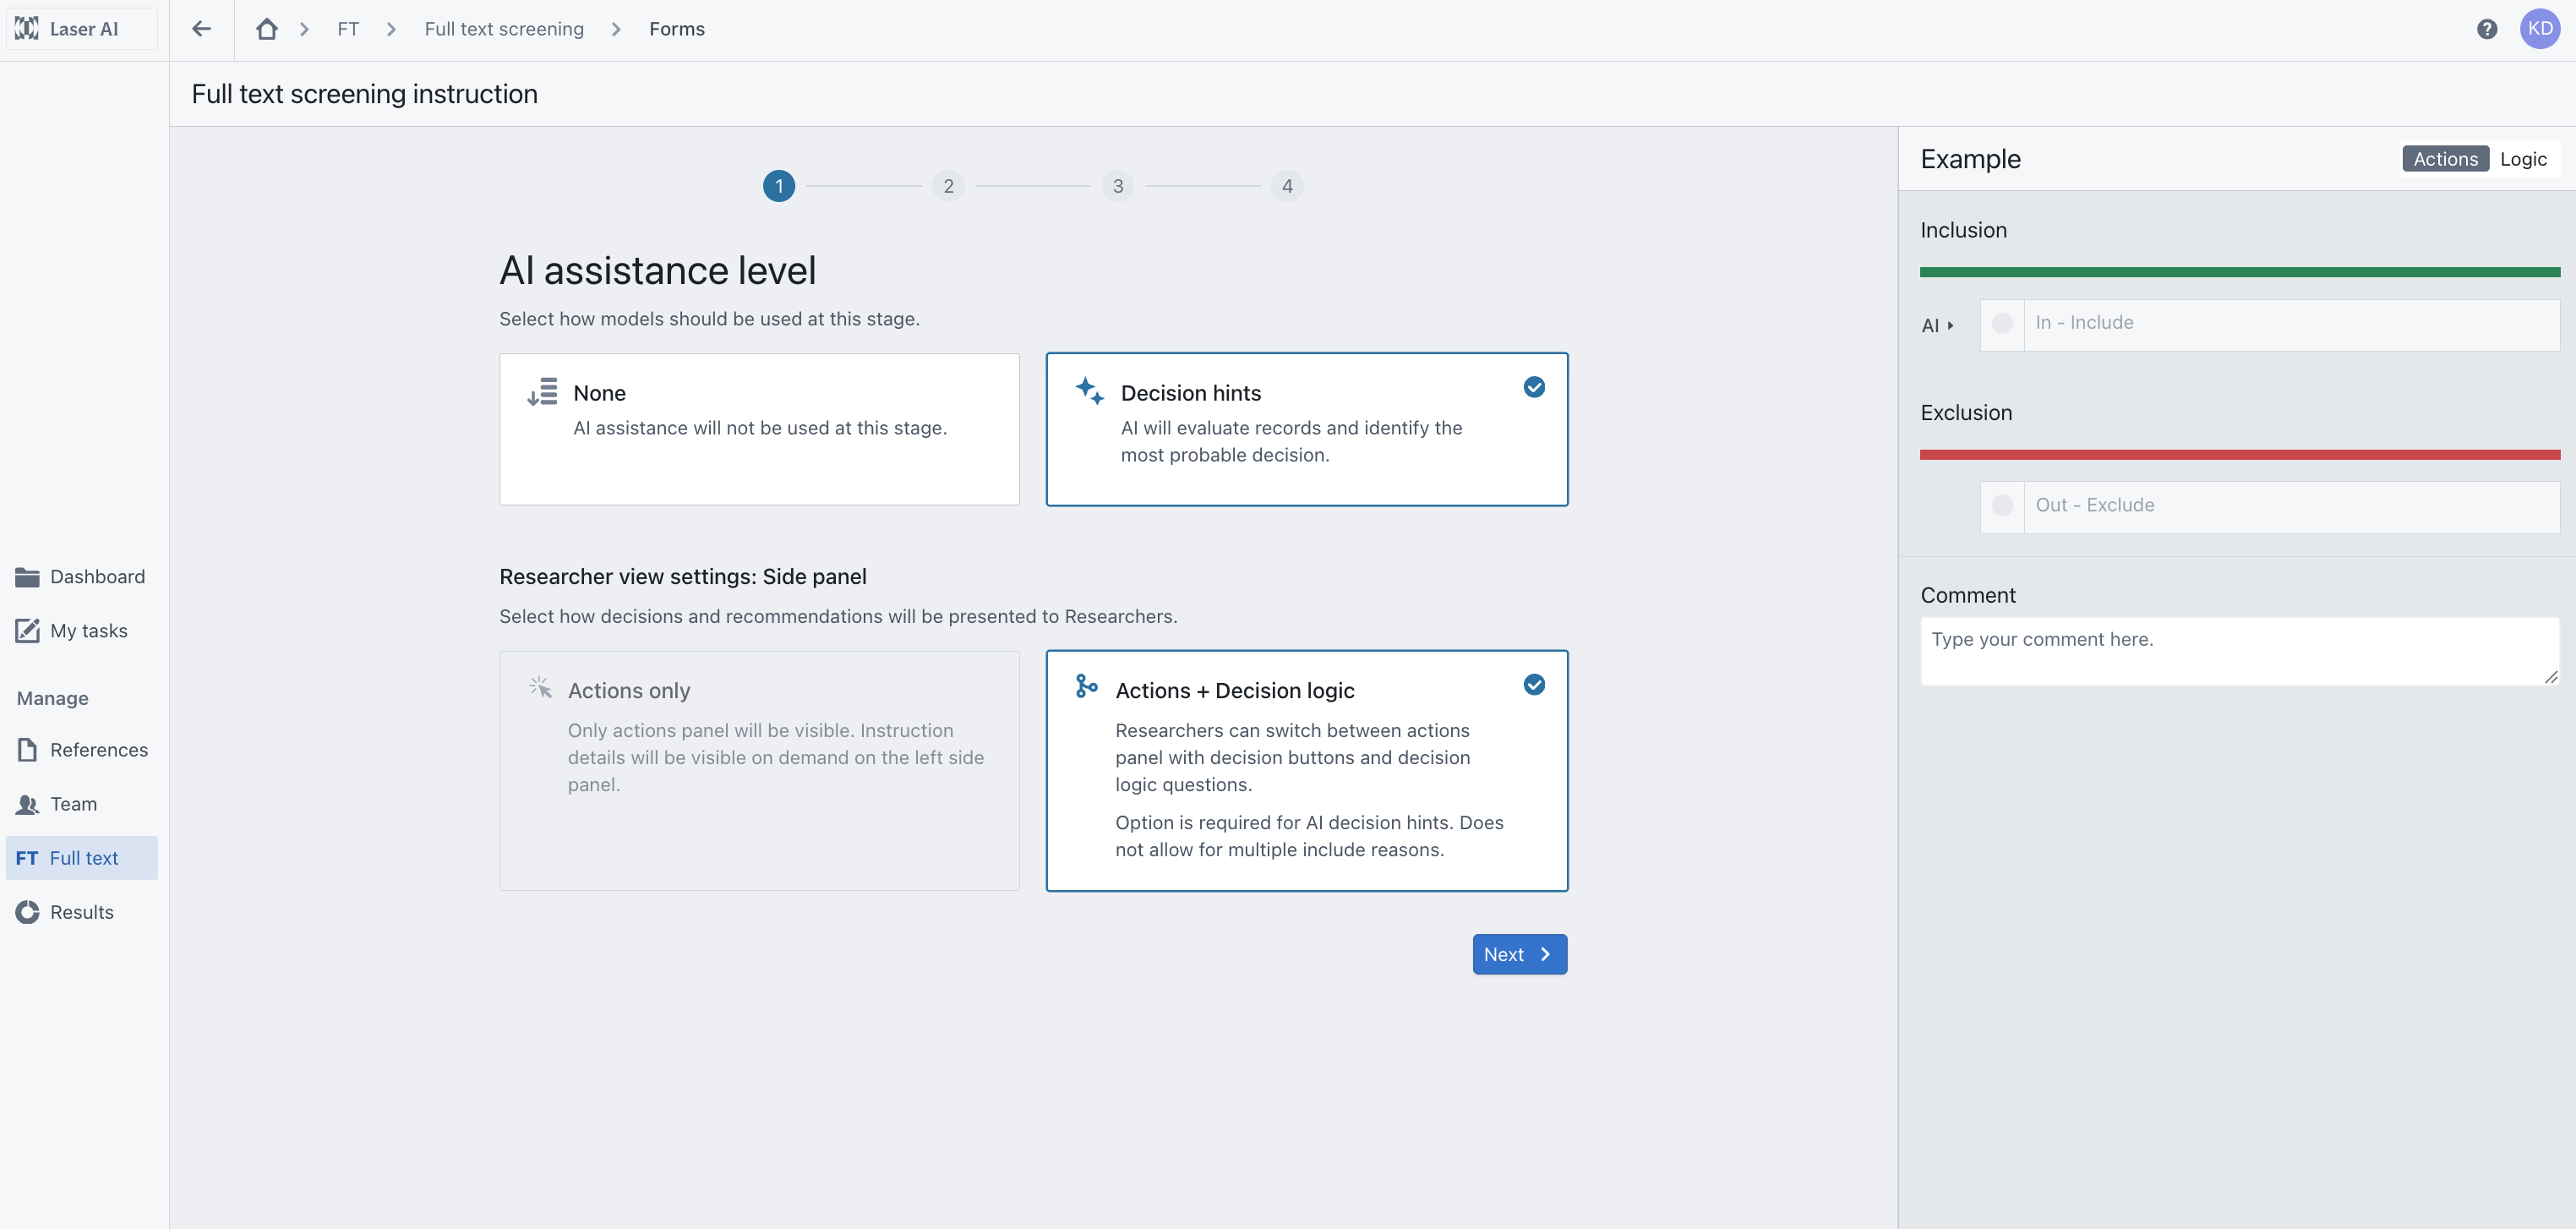
Figure 16. AI assistance settings for FT screening, with Decision hints and Actions + Decision logic selected.
Option 1. Generate instructions de novo from the project description
1. Create a practice project with only Full-text screening enabled.
2. Copy the Project description from the training project dashboard, or use the description of a review of your choice. Include the review question and inclusion and exclusion criteria so the draft reflects your intended eligibility rules.
3. Start the instruction setup as described above. On Instruction setup, select Generate new instruction and select Next. Review or choose the action buttons on the following screen, then continue with Next. The action buttons can be modified later.
4. Paste the project description and eligibility criteria into the Eligibility criteria box. Select Generate instruction draft.
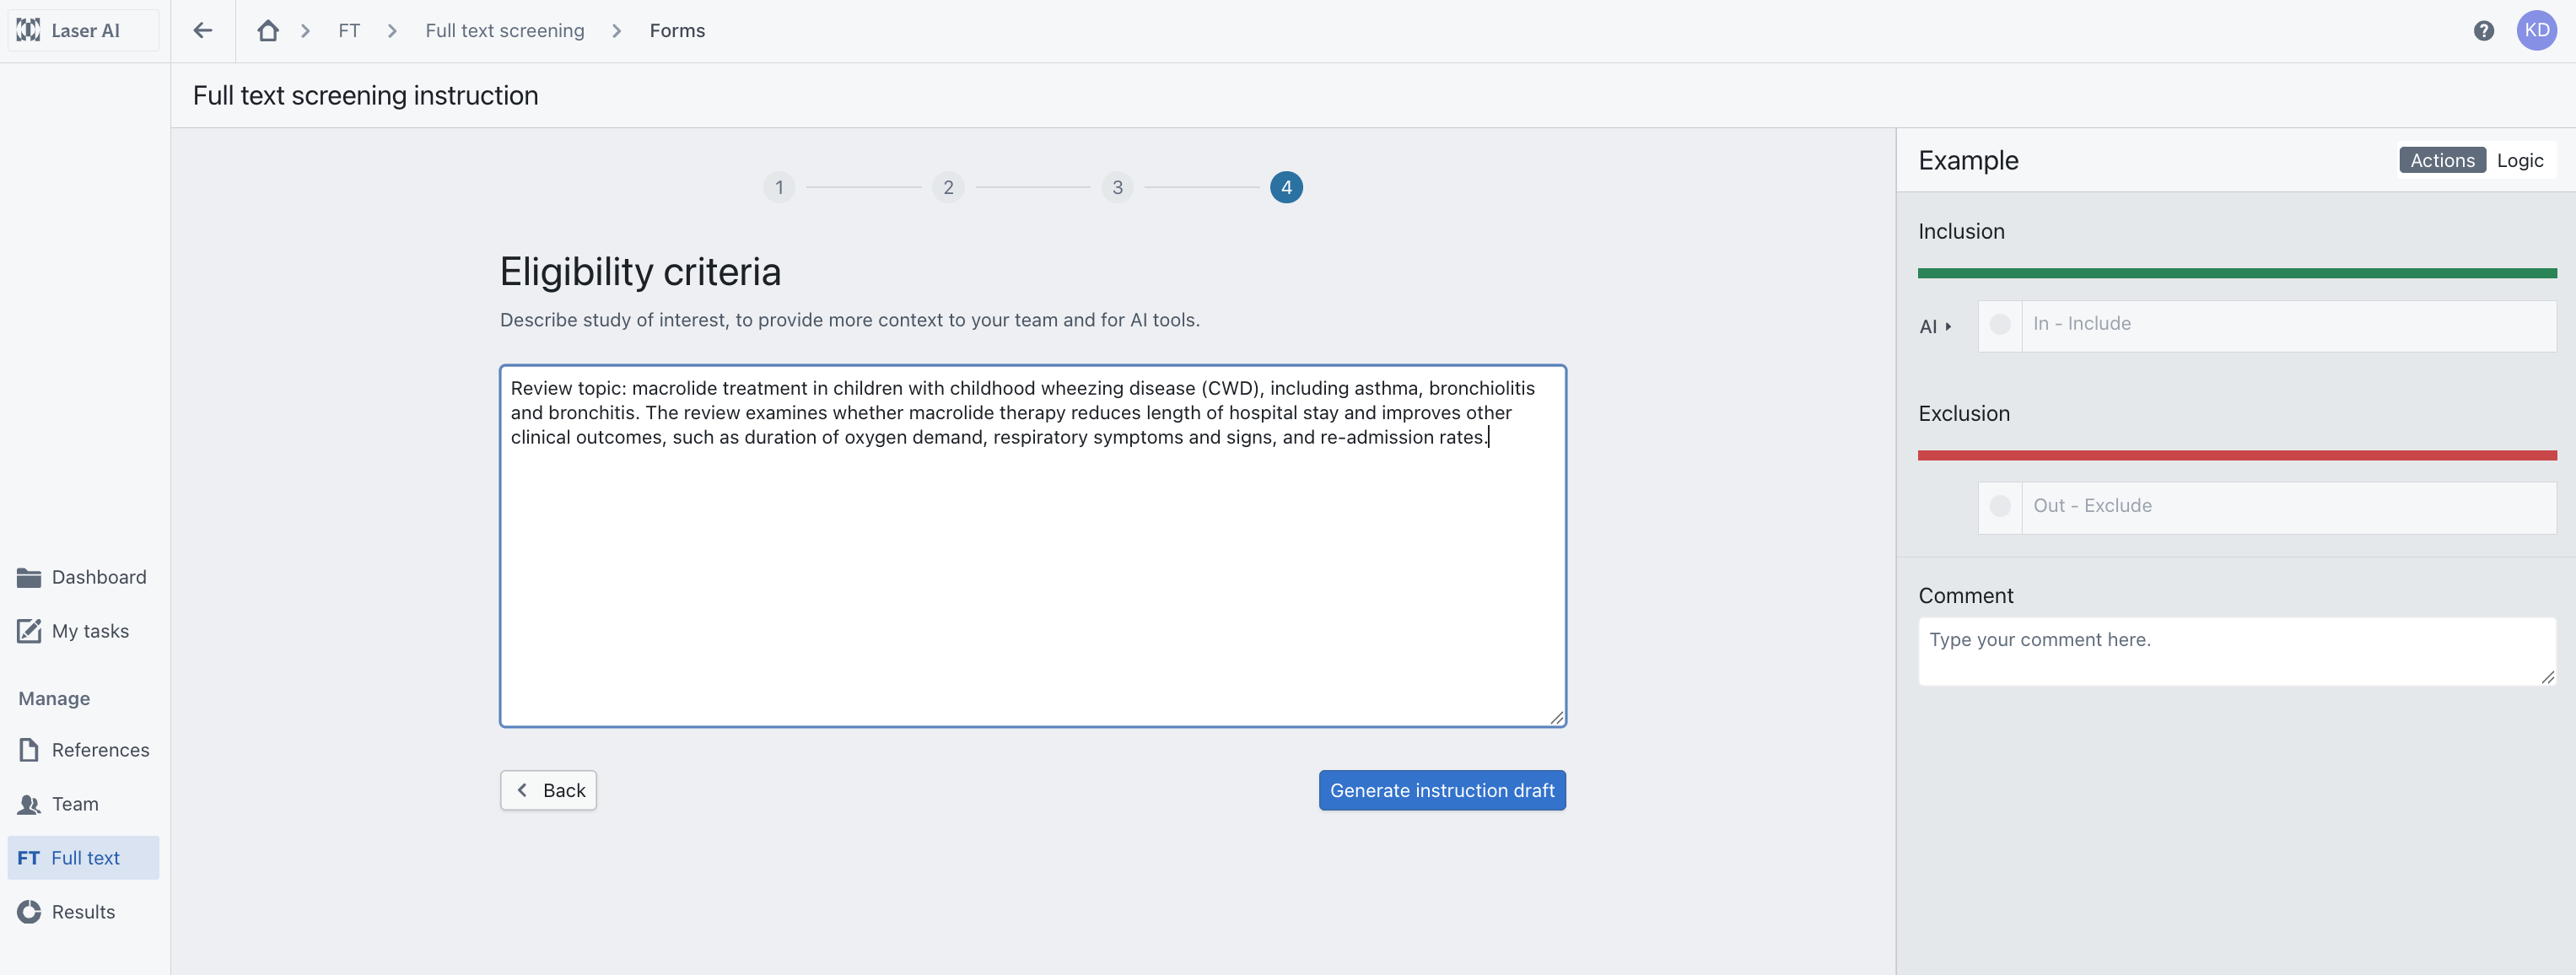
Figure 17. Eligibility criteria screen for de novo generation, with the project description entered and the Generate instruction draft button below.
Option 2. Adapt existing TiAb screening instructions
1. Prepare a project with both Title and abstract screening and Full-text screening enabled. Prepare the TiAb screening instructions first and save them as ready; they provide the starting point for the FT draft.
2. Open the FT instruction setup and select the AI settings described above. On Instruction setup, select Adapt instruction to full-text screening, then select Next. This copies the TiAb setup and uses it to generate an FT decision-logic draft.
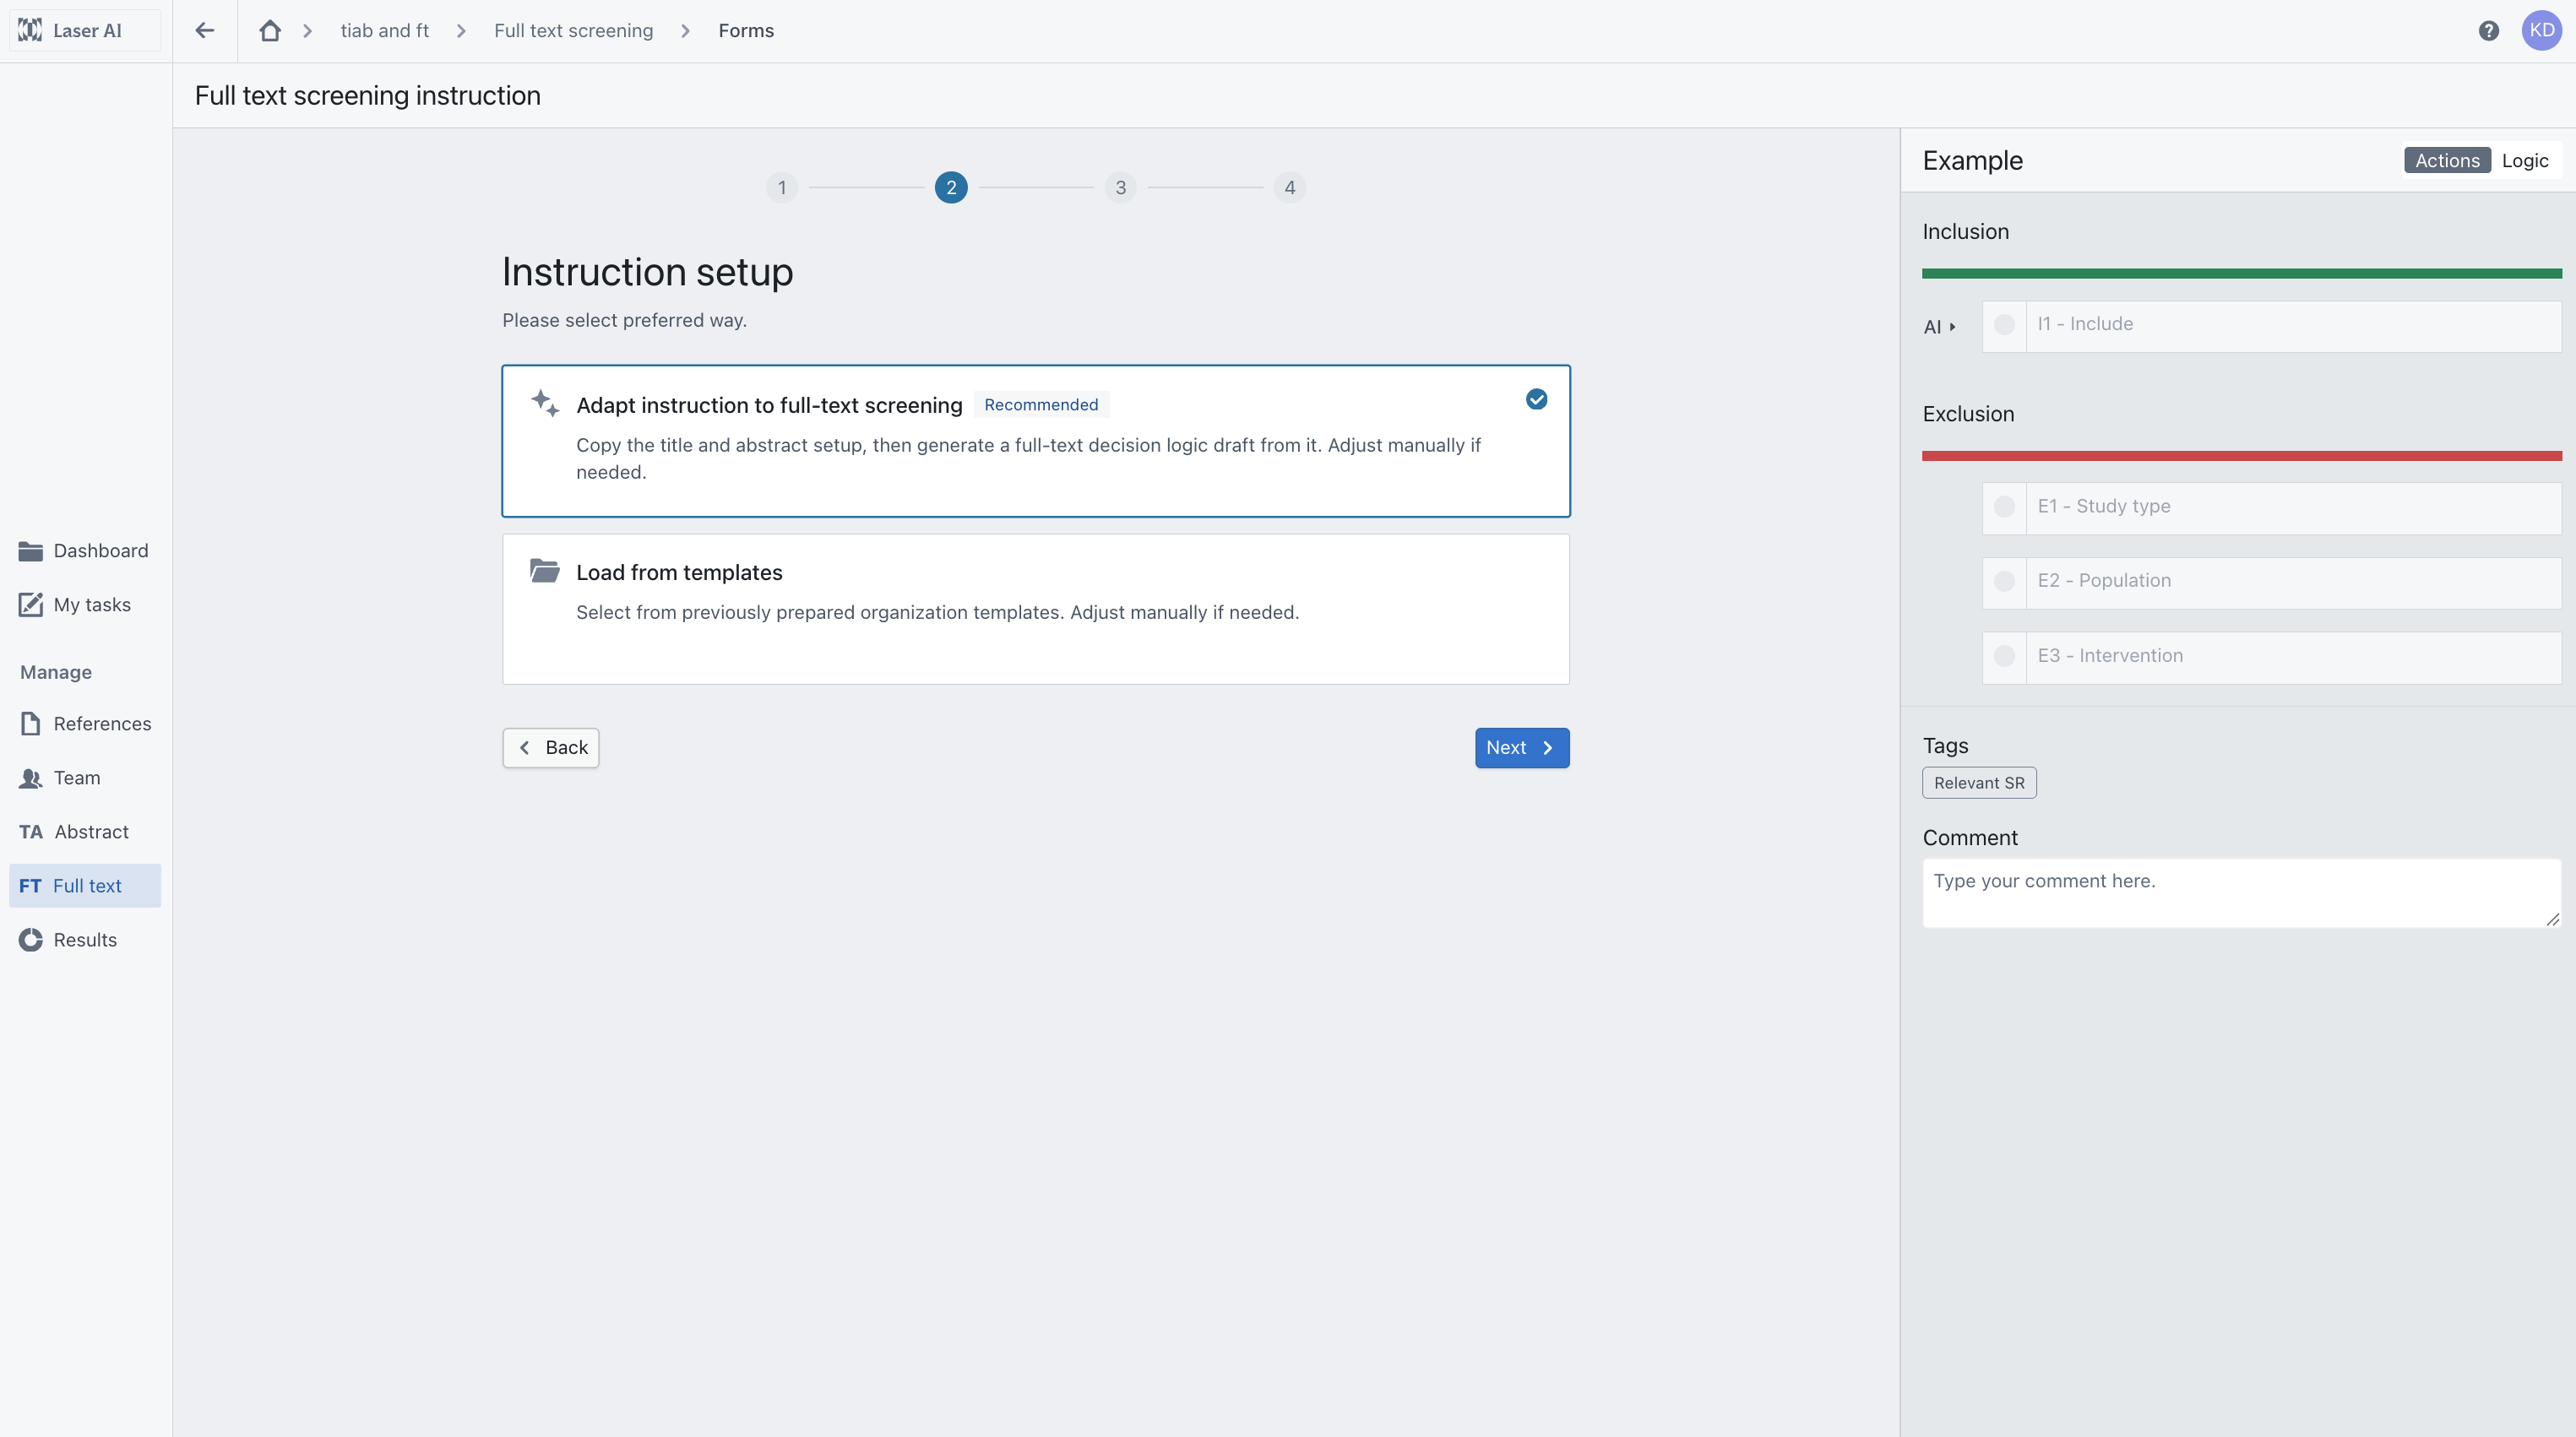
Figure 18. Instruction setup in a project with both screening stages enabled. Adapt instruction to full-text screening uses the prepared TiAb setup as the starting point.
3. Follow the remaining setup steps, review the copied settings and action buttons, and generate the FT instruction draft.
Review the draft before applying it
For either option, check every question, its guidance, the answer mapping and the resulting inclusion or exclusion reason against your review criteria. Ensure the instructions use the information available in the full text and explain how to handle missing or unclear information. When adapting TiAb instructions, review any rules that retained uncertain records for further assessment and decide how those cases should be handled at the FT stage.
Edit the draft where needed. Use Save as draft if it needs further review, or Save and apply when the instructions are ready for use in your practice project.
Knowledge base: Full-text screening instructions set up
Was this article helpful?
That’s Great!
Thank you for your feedback
Sorry! We couldn't be helpful
Thank you for your feedback
Feedback sent
We appreciate your effort and will try to fix the article